If you would like to read the other parts in this article series please go to:
So far in this article series we have seen what the purpose of the new Data Loss Prevention feature of Exchange 2013 Preview is, how it works and how to create DLP Policies using both the Exchange Administration Center and the Exchange Management Shell Exchange.

Policy Tips
In the first part of this article, we saw that we can notify a sender if he/she is about the send information that violates a DLP Policy. But how is the sender notified? By including a Policy Tip notification message!
These Policy Tips are similar to the MailTips introduced in Exchange 2010 as they display a notification message to Outlook users when they are composing an e-mail. Obviously they only show up if Exchange detects something in the e-mail that violates a DLP Policy currently in place and if this policy has a rule to notify the sender.
A great thing about Data Loss Prevention [DLP] and Policy Tips is that Exchange will automatically look into a message’s subject, body and even attachments when evaluating conditions within policies. This means that if a user is writing an e-mail with a perfectly normal body text but attaches an Excel document with credit card details, then a Policy Tip notification that you create will be shown to the sender in Outlook reminding him/her of the policy against such action.
The benefit of Policy Tips is that if a user writing an e-mail is made aware in real-time that he/she might be violating a corporate policy, then he/she is less likely to violate it.
Now let’s test a few DLP Policies and look how these Policy Tips look like.
Testing DLP Policies
Let’s send a couple of e-mails to test these policies – remember that at this time both policies are set to Enforcement mode as we recreated the first policy (which was in Audit mode) in PowerShell and set it to this Enforce.
Let’s start by writing an e-mail with a credit card number attached:
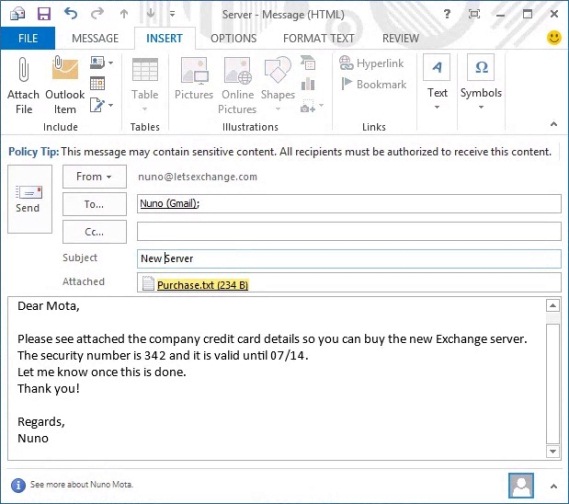
Figure 3.1: Writing E-mail with Confidential Data
Note that while I am writing the e-mail a Policy Tip came up stating that the e-mail contains sensitive content! Even though the body of the e-mail doesn’t contain anything confidential, the attached file contains a credit card number which Outlook highlights straight away!
The interesting part is that these rules are smart enough to detect “valid” credit card numbers. If you simply type a random 16 digit number it will not flag it as being a credit card number! Also, no matter if you put spaces or not in-between each 4-digit set of numbers, Exchange will still detect it.
Because this e-mail only contains 1 credit card number, the existing policy will allow the e-mail to go through. Instead of including more credit card numbers in the e-mail (more than 9 as we saw in the first part of the article) I simply updated the High Count rule of this policy to match 1 or more credit card numbers and send the e-mail again. As expected, it gets blocked:
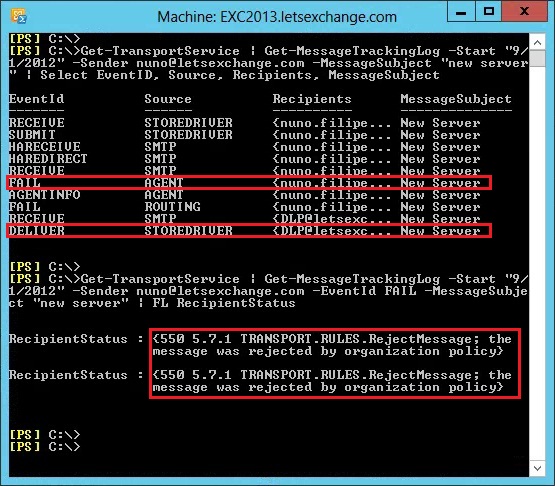
Figure 3.2: Blocked E-mail – Message Tracking Logs
Note the FAIL EventID, a report being sent to the DLP mailbox and the RecipientStatus saying why the message was rejected.
As I mentioned in the first part of this article, DLP information also gets written into the Message Tracking Logs (more than what I showed in Figure 3.2 above). These logs contain data from the Agents involved in processing mail flow content. For DLP, the Transport Rule Agent [TRA] is used to scan message content and apply the policies defined as part of the Exchange Transport Rules [ETRs]. The existing AgentInfo Event is used to add DLP related entries in the Message Tracking Log. If we look deeper into the logs of Figure 3.2, we can see this data:
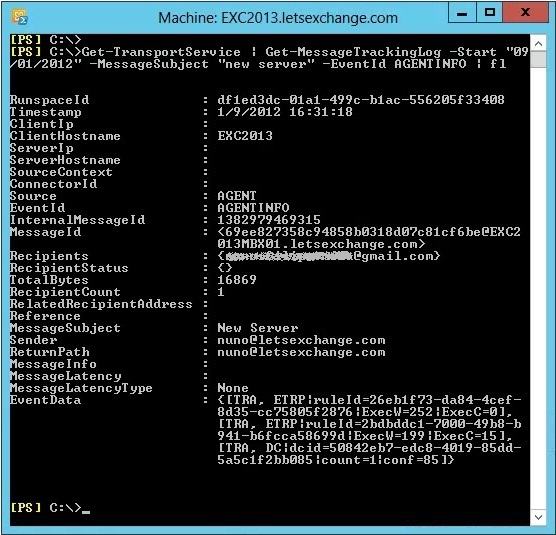
Figure 3.3: Incident Data Logging
In the above screenshot, by the number of ruleId fields in EventData we can see the agent processed the e-mail against 2 rules. These fields are as follows:
-
The TRA (Transport Rule Agent) is ETRP (Exchange Transport Rule Performance)
-
The ruleId is 26eb1f73-da84-4cef-8d35-cc75805f2876 – you can check what rule this is by running the cmdlet Get-TransportRules | ? {$_.GUID –eq “26eb1f73-da84-4cef-8d35-cc75805f2876” which in this case is the Block Passport Numbers rule we created and which didn’t match anything
-
The execW (Execute Wall Clock) is 252ms
-
The exec (Execute CPU Clock) is 0ms
-
The TRA (Transport Rule Agent) is ETRP (Exchange Transport Rule Performance)
-
The ruleId is 2bdbddc1-7000-49b8-b941-b6fcca58699d – in this case is the Financial Data (U.S.): Monitor Data Sent To Outside High Count rule as we expected
-
The execW (Execute Wall Clock) is 199ms
-
The exec (Execute CPU Clock) is 15ms
-
The TRA (Transport Rule Agent) is DC (Data Classification)
-
The dcid (ID of the Data Classification) is 50842eb7-edc8-4019-85dd-5a5c1f2bb085
-
The count (Count of the Data Classification) is 1 as only one credit card number was found
-
The conf (Confidence level of the Data Classification) is 85%
Looking into the DLP Incident mailbox, we can see the report for this e-mail, including the text of the attached file! This report also includes similar information as the one seen in AgentInfo previously:

Figure 3.4: Incident Report
Note that the severity was set to High; it wasn’t an override; a Credit Card Number was detected with a count of 1 and a confidence level of 85%; the triggered rule was Financial Data (U.S.): Monitor Data Sent To Outside High Count; the Report ID Match shows the credit card number found and in Context we have the entire content of the text file.
Also, me as the sender received the following Non-Delivery Report [NDR] message:

Figure 3.5: Non-Delivery Report Message sent to Sender
However, nor the Policy Tip nor this NDR say how to override the policy as they should… It seems that this part is not 100% finished yet or perhaps I missed something…
Finally, let’s test an override. This time, let’s send the same e-mail message but with the word “override” in the subject (as this is the default override method, which obviously can be changed). As expected, the e-mail is allowed to go through but a report is still sent to the DLP Incident mailbox as configured in the Allow Override rule:
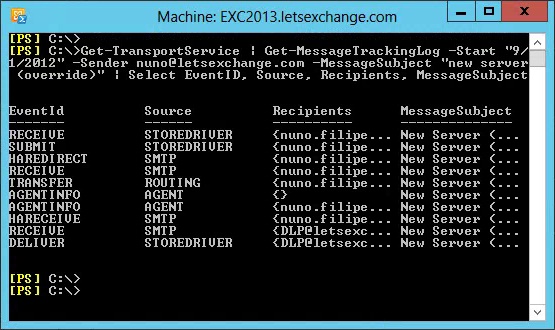
Figure 3.6: Allowed E-mail – Message Tracking Logs
Looking at the header of the received e-mail, we can see that the X-Ms-Exchange-Organization-Dlp-SenderOverrideJustification field was set to TransportRule override even though the same Financial Data (U.S.): Monitor Data Sent To Outside High Count rule was triggered:
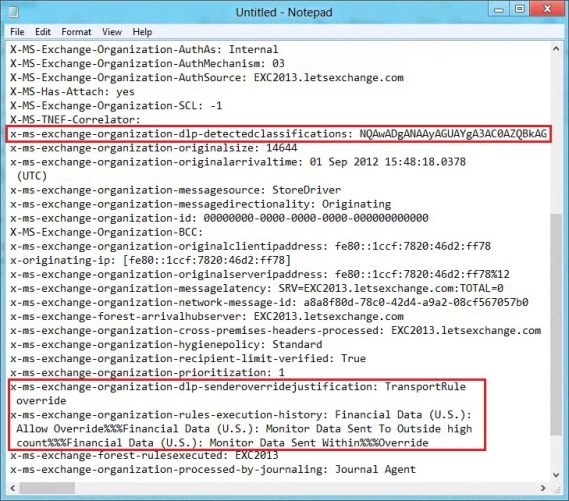
Figure 3.7: Message Headers
Conclusion
In this article series we looked at the new Data Loss Prevention feature of Exchange 2013 Preview and how it can help organizations to prevent their users from sending confidential information using Exchange.
Exchange Administrators always had to rely on 3rd-party solutions to achieve any kind of data protection, but some of these solutions would cause more harm than good and user productivity would suffer. With Exchange 2013 and DLP, Microsoft now makes it possible to enforce compliance requirements for such data and control how it is used in e-mail. This is without a doubt a big step forward in Exchange!
If you would like to read the other parts in this article series please go to:


Hi. This is such a well explained article! Thanks.
Wonder if you have ever gotten NDR if the PII was actually in the “Author” field property? In this case, the Policy Tip does not appear, yet Exchange blocks the email.
Hi Mark,
Thank you so much! 🙂
To be honest, I haven’t tested that particular scenario, but I will now!
Regards,
Nuno