Introduction
With vSphere 5, VMware continues distancing itself from Microsoft Windows. I already wrote about the new vSphere 5 Web-based vSphere Client. Now, let me help you to get started with the new vSphere 5 vCenter Server Appliance (also known as the vCSA).
The vCSA is a new way to create a vCenter server. Instead of having to create a virtual machine, install Windows, do all the typical “Windows” stuff (patches, AV, management apps), install vCenter, and install the SQL Express instance that comes with vCenter for Windows (or use an external database), and then manage another Windows server for the long-term, with vCSA you don’t have to do any of that. Besides the time savings, consider the Windows Server license cost savings that you will realize by using a Linux-based virtual appliance instead of a Windows Server license.
vCSA will allow you to simple import (aka “deploy) a vCenter VM (that you downloaded) directly to an ESXi server, perform a couple quick changes, and you are ready to go!
Let’s find out how…
Downloading the vCenter Server Appliance (vCSA)
You download vCSA at the exact same place that you download the traditional Windows vCenter server appliance, go here (if you already have a vSphere license), or if you are new to vSphere, you can always try the latest version of vSphere (vSphere 5, in this case) at Try VMware, free for 60 days. No matter which path you take, you’ll end up on the list of vSphere products to download, which will include vCSA. What’s different about vCSA, when it comes to downloading, is that you’ll need to download 3 files to make it work vs the single, traditional, vCenter Server for Windows install file (either a ZIP or ISO file).
With vCSA, download the .OVF file, the .VMDK system disk, and the .VMDK, data disk (as you see in Figure 1, below). The system disk, at 4GB, is going to be the largest of them all (by far).

Figure 1
When you download these files, make sure that they end up in the same directory as the .OVF file (when you deploy it) will be looking for the two .VMDK files and expect them to be there.
I highly recommend using the VMware Download Manager for these files (especially the 4GB system disk) as it has the ability to resume download if it gets interrupted.
At this point, you may be thinking like I was when I first saw that I had to download a 4GB file – that this is going to take, potentially, even longer than it would to just install the Windows version of vCenter. Actually, the Windows vCenter server download is about 2GB and if you take into account the time to download that file, install the guest Windows OS, and then install vCenter (with the local SQL Express database), the time is actually much greater.
Once the files are downloaded, they should look like this:

Figure 2
With your files ready to go, we can move on to deploying the vCSA.
Deploying vCSA
VMware’s virtual appliances are stored in the “OVF format”. OVF stands for open virtualization format and it is an open standard. The OVF file basically described what the VM’s configuration will be and references the virtual disks that it will need. In the case of vCSA, we’ve got our OVF file and two VMDKs, which it references, to “import”. You can, in fact, download thousands of different VMware virtual appliances (mostly in OVF format) from the VMware virtual appliance marketplace. It is great to see VMware embracing this format as a way to deploy vCenter and other pieces of the virtual infrastructure.
To deploy vCSA into your vSphere infrastructure, you first need to connect your vSphere Client (has to be the Windows version at this point, the web-version wouldn’t work as you don’t have the server side of that yet) to the ESXi server where you want vCSA to run (remember, you don’t have vCenter yet).
From there, in the vSphere Client, go up to File and down to Deploy OVF Template (as you see in Figure 3, below).

Figure 3
This will bring up the Deploy OVF Template Wizard that asks you a series of questions about how and where this VM will go. The first thing you’ll have to provide is the path to the OVF file that you downloaded (as you can see in Figure 4).

Figure 4
The vCSA appliance will be recognized and you’ll get some info about its name, version, and amount of disk space it will take up on disk (once deployed).
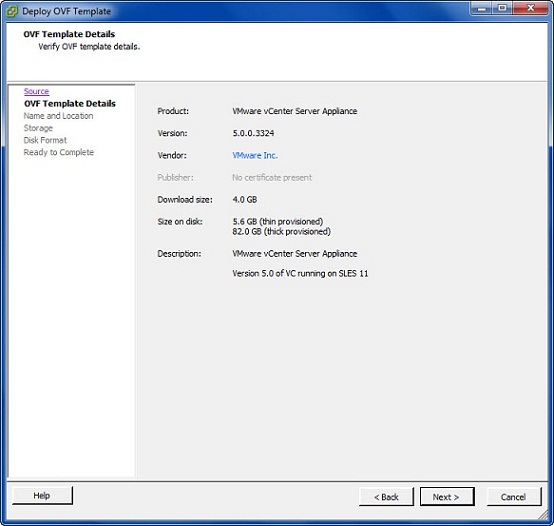
Figure 5
You’ll give the new vCSA VM a name (whatever you desire).
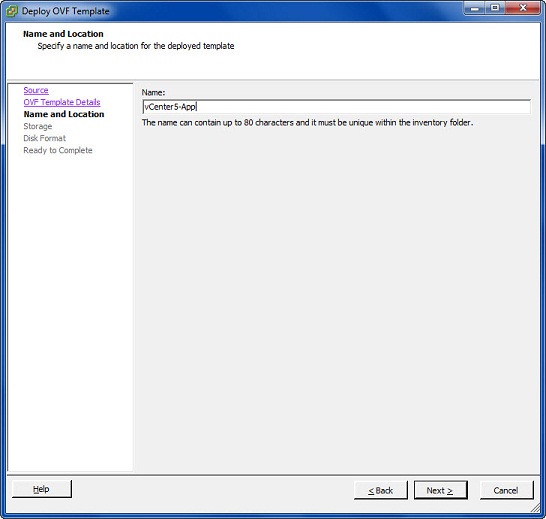
Figure 6
Select what vSphere datastore this VM will be stored on (could be a local disk but I recommend a NAS or SAN for features like VMware High Availability).
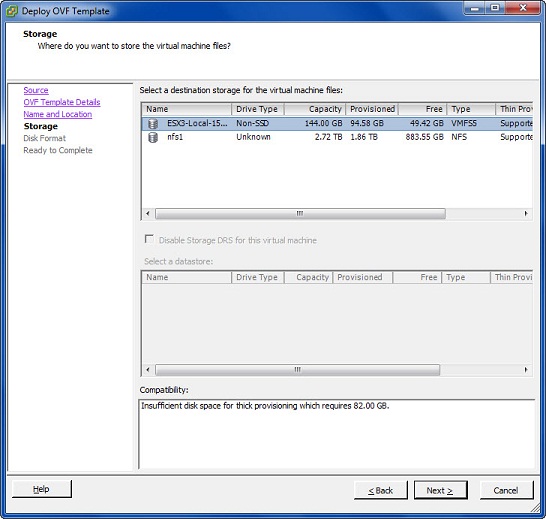
Figure 7
You’ll specify the type of virtual disk for this new VM (vSphere 5 has new disk types –flat, thick and thin). The format that will use the least amount of space in a lab environment is “thin” but for the best performance you should select flat (thick is typically selected if you are using VMware Fault Tolerance).

Figure 8
At this point, you’ll see that final summary and confirmation screen, essentially asking you “are you sure”. Click Finish and the deployment process will begin!
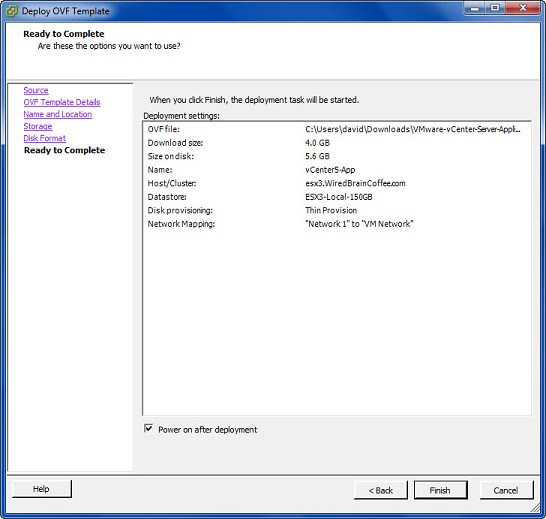
Figure 9
You’ll see that the vCenter Server Appliance is now being deployed. This involves copying the 3 files you downloaded from your local computer up to the ESXi server where you are deploying the VM, creating the VM, and powering it on (if you chose to do so). Keep in mind that, yes, that 4GB file is being copied from your local computer to the server so, depending on the speed of your network connection, this may or may not take a long time (i.e. it could be a while if you are on slow wireless network, moving it from your laptop up to the ESXi server).
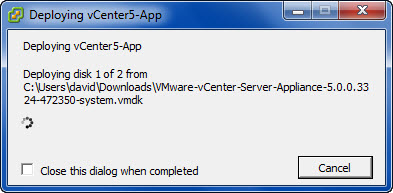
Figure 10
Once completed, you should see the new vCenter appliance as a new VM on your ESXi server. As you can see in Figure 11, it is a SUSE Linux-based VM with a default resource utilization of 2 vCPUs, 8GB of RAM, and it will use about 5GB on disk (if you chose thin provisioning).
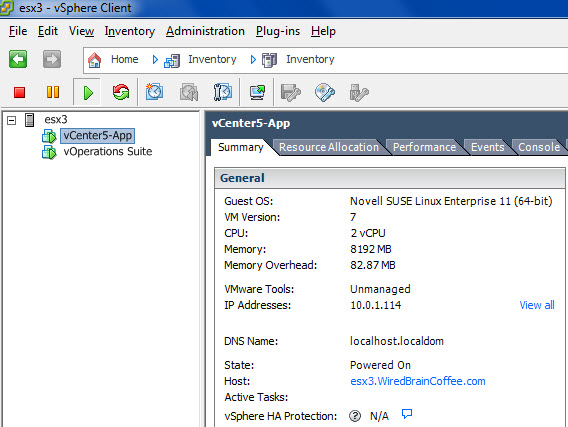
Figure 11
Something else you can see from the vSphere Client is that this vCSA received an IP address via DHCP and that IP address should be entered into you DNS server with an alias pointing toward something like “vCenter”.
While you can use that IP address (or hostname, once you configure DNS) to connect to and configure the new vCSA (if you use the correct point number), I recommend first opening the VM console to see what it looks like.

Figure 12
As you’ll see in the vCSA console, you’ll have the IP address and port number to manage the vCSA, and the steps you’ll need to perform initial configuration of the vCSA (you can’t use it as your vCenter server until you do these things).
You may want to use this text-based console to perform the initial network configuration and set the time zone OR you can do those things in the GUI console. The vCSA does have a Linux-based CLI console, as well, if you go into “Login”, that can be used for management and troubleshooting of the appliance (if needed).
To learn how to perform configuration of vCSA, please read on to the next article in this series.


