If you would like to read the other parts in this article series please go to:
- GroupWise to Exchange 2007 – Interoperability and Migration (Part 1)
- GroupWise to Exchange 2007 – Interoperability and Migration (Part 2)
- GroupWise to Exchange 2007 – Interoperability and Migration (Part 4)
- GroupWise to Exchange 2007 – Interoperability and Migration (Part 5)
- GroupWise to Exchange 2007 – Interoperability and Migration (Part 6)
- GroupWise to Exchange 2007 – Interoperability and Migration (Part 7)
- GroupWise to Exchange 2007 – Interoperability and Migration (Part 8)
- GroupWise to Exchange 2007 – Interoperability and Migration (Part 9)
In Part 2 of this series my co-author Declan Conroy and I showed how to install the required components to enable connectivity between GroupWise and Exchange. Now in Part 3, we are going to cover configuration. If everything goes according to plan, everything will work the first time. If it does not, we will dive into testing and troubleshooting in Part 4.
About co-author Declan Conroy
 Declan Conroy is an IT consultant specializing primarily in Microsoft technologies including Exchange and Active Directory. Having previously worked for companies like Hewlett Packard and Compaq both as internal IT support, middle management and as a Professional Services consultant, Declan founded Cheddon Consulting Limited in April 2005. Since then Cheddon Consulting have migrated over 150,000 mailboxes to Exchange Server.
You can contact Declan here, or through his blog.
Configuring GroupWise
To start configuration of the GroupWise section on your Windows Admin workstation, firstly, browse to \sys\public\win32 on the eDirectory server as shown in Figure 1, and run NWADMIN32.exe.
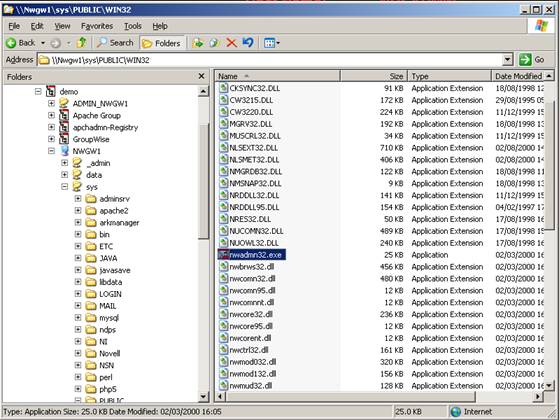
Figure 1: The directory from which NWADMIN32.exe is run
We will come back to NetWare Administrator but for now just leave it running.
Open ConsoleOne. I am running version 1.3.6f with the GroupWise Snap-ins.
In the left hand pane, under My World, Expand GroupWise System, and select the Domain that the GroupWise Server running the API is installed in. In my case this is DOM1. Right click and select New Gateway as seen in Figure 2.
These instructions differ slightly from the NetWare Administrator instructions, but they work, trust me!
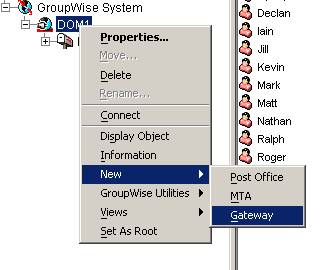
Figure 2: Starting the New Gateway creation process
In the Create GroupWise Gateway/Internet Agent dialogue box shown in Figure 3, use the following properties.
Select Gateway (including GroupWise WebAccess).
For Gateway name I usually type Exchange.
You should be able to leave all of the rest of the settings at their defaults.
-
Gateway Home Directory: API
-
Language: English – UK (I am located in the UK)
-
Time Zone: (GMT)
-
Gateway type: API
-
Version: 4.x
-
Platform: NetWare
Do not tick the box to Define additional properties, and press OK.
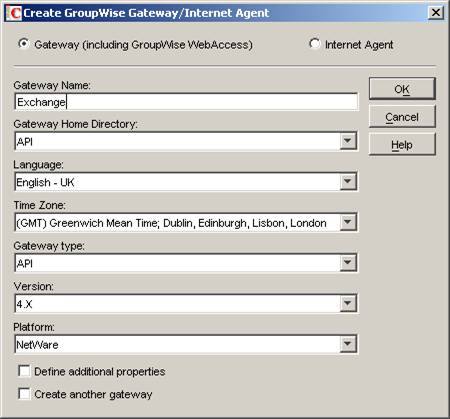
Figure 3: The Create GroupWise Gateway/Internet Agent dialog box
Now switch to NetWare Administrator which you opened early. I am running Version 5.1.9f also with the GroupWise Snap-ins.
Expand the GroupWise Object, and the Domain object. Right Click on the new Exchange Gateway we have just created and select Details…
Select Optional Gateway Settings as shown in Figure 4.
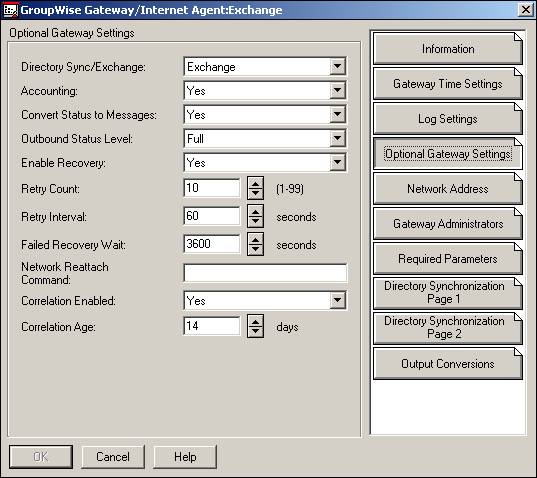
Figure 4: The optional settings area of the new GroupWise Gateway
Set the following values
- Directory Sync/Exchange: Exchange
- Convert Status to Messages: Yes
- Outbound Status Level: Full
Click Required Parameters and verify both of the Root Directory listings are in the correct format as shown in Figure 5. These should be <Server Name>/<Volume>:\<Path>, so in my case they will both be NWGW1/DATA:\dom1\wpgate\api
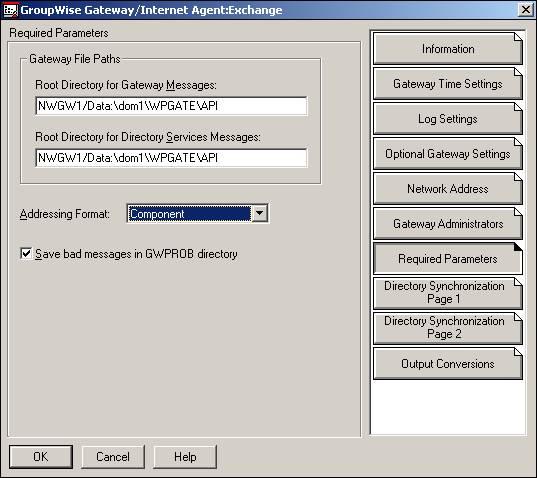
Figure 5: Checking the required parameters of the new GroupWise Gateway
Set the Addressing Format: to Component and hit OK.
Now that the gateway has been properly configured, we can load it from the NetWare system console using the following command –
API
We are almost done with the GroupWise system; we just need to configure the API to talk to Exchange.
The API gateway we have just installed is the means by which messages will be delivered between the GroupWise and Exchange systems. We now need to instruct GroupWise which messages to send using this Gateway, or to be more specific, that in a migration to Exchange we want all messages for Exchange to use the gateway.
We do this by configuring an External Foreign Domain within the GroupWise system, and linking to it via the API gateway.
In Netware Administrator (NWADMIN32.exe), select GroupWise View… from the Tools menu.
Expand the domain object, and find the Exchange Gateway object we have just created, right click and select Create… as shown in Figure 6.
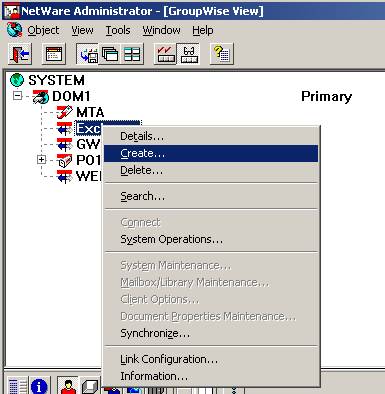
Figure 6: Creating an External Foreign Domain
Select External Domain and press OK in the window shown in Figure 7.
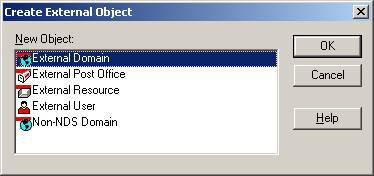
Figure 7: Selecting to create and External Domain
In the External Domain Name: field shown in Figure 8, I usually type Exchange. You can type anything, but it must correspond with the GWISE proxy address you generate in Exchange Recipient Policy within ESM, and this defaults to Exchange.
Change the Domain Type: to External Foreign, as this new domain is used to represent the Exchange system to the GroupWise system.
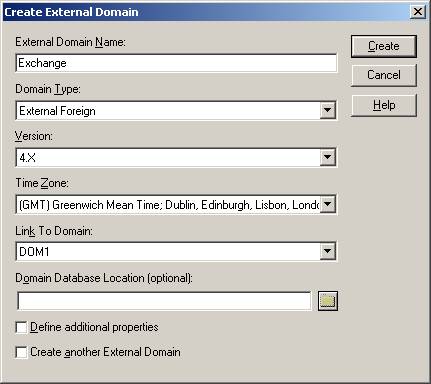
Figure 8: Configuring the External Foreign Domain
Leave the version at 4.x, as the API gateway is version 4.1.
The value listed in Link To Domain: should be the domain that the API gateway has been installed in which in our case is DOM1. Click Create and we are in business.
Switch back to ConsoleOne. Right click the newly created Exchange domain, and select GroupWise Utilities, Link Configuration… as shown in Figure 9.

Figure 9: Beginning the process to Link the External domain to the Gateway
Right click the newly created Exchange domain within the GroupWise Link Configuration Tool and select Edit… as shown in Figure 10.
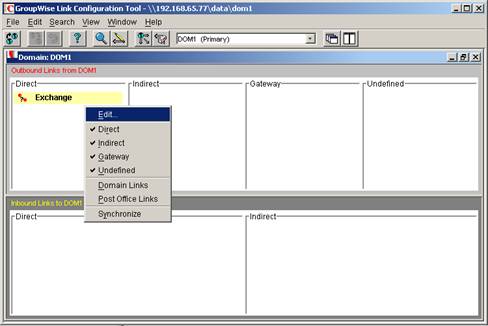
Figure 10: The GroupWise Link Configuration Tool
Change the Link Type: to Gateway, and ensure the Gateway Link: under Settings lists the Exchange gateway we created earlier as you can see in Figure 11.
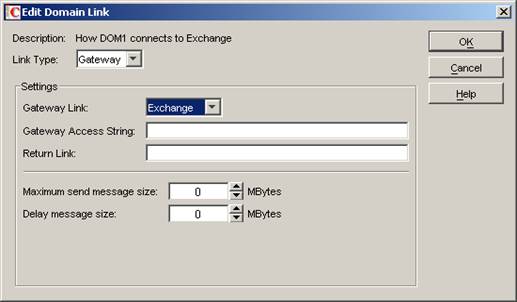
Figure 11: Configuring the Link between the External Domain and the Gateway
Press OK and then File, Exit to close the GroupWise Link Configuration Tool.
When prompted to Save link changes for Domain as shown in Figure 12: press Yes
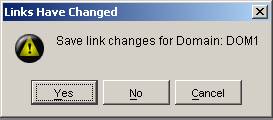
Figure 12: Saving Link Changes
We are done with GroupWise configuration, so let us briefly recap on what we have done here.
We have installed the most up to date version of the generic GroupWise API, which is 4.1 Patch 5. We have configured GroupWise to recognize the existence of our Exchange System by setting up an external foreign domain, and we have told it that to reach this domain we need to use the API gateway.
Account Permissions
We are about to configure the Exchange Connector for GroupWise, but before we do, we need to set up an account within eDir for the connector to use. Tempting as it is to simply use the Admin account; it is worth taking a few extra minutes here.
Remember, the API gateway is simply a set of files and folders within the GroupWise system, which is running on a Novell volume. In fact the Exchange Connector is not much different, and we will look more closely at the file/folder structure in a later article.
For now it is important to understand that in order for the Exchange connector to interact with the GroupWise folder structure, and ONLY the GroupWise folder structure, we need to create and secure an account for it to use.
You can do this from either NetWare Administrator or ConsoleOne. We will use NetWare Administrator.
Right Click the eDirectory OU structure where you want to create the service account, and select Create… then pick User from the New Object class list shown in Figure 13.
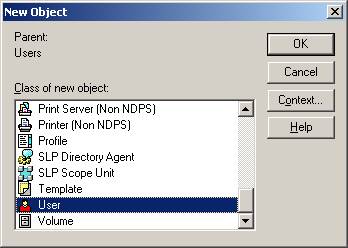
Figure 13: The New Object window where we opt to create a User object
The next window to open is where you set up the user as shown in Figure 14. Under Login name: I usually type Exchange and under Last name: I usually type Service. Select the Define Additional Properties check box and press Create.
Notice the full context sensitive Login name: which in this case is Exchange.Users.Demo

Figure 14: Setting up the new user
In order to set up a password, use the options available under Password Restrictions. Having done that click Rights to Files and Directories, this is the bit we are interested in and it can be seen in Figure 15 It is not a familiar interface, but remember, all we are trying to do here is grant the newly created Exchange Service account rights to the API root directory, so bear with me.

Figure 15: The Rights to Files and Directories window
Under Volumes: click Show… and navigate to the volume in which the API gateway is installed. This is the same volume listed in the NWGAPI.PRM file, in my case it is the DATA volume on NWGW1, or NWGW1_DATA as it appears in the Select Object dialogue box shown in Figure 16.
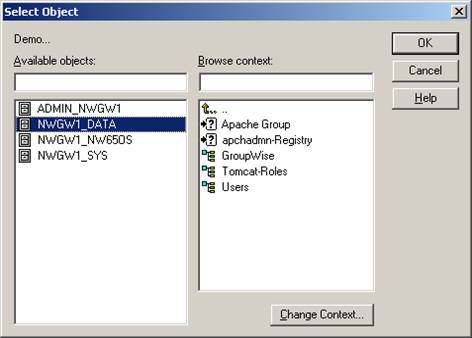
Figure 16: The Select Objects dialogue box
Once I have selected the correct volume in the left hand pane of Available objects: press OK, and then under Files and Directories: choose Add…
Use the right hand pane to browse to the API gateway directory as shown in Figure 17, which in my case is under DOM1\wpgate and press OK.

Figure 17: Selecting the API directory to assign permissions to
Back on the Rights to Files and Directories window shown in Figure 15, under Rights, assign everything except Supervisor and Access Control and press OK.
The Rights to Files and Directories screen is now displayed as per Figure 18 below.
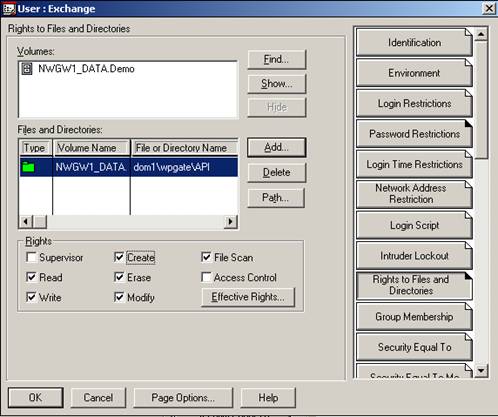
Figure 18: Rights to Files and Directories with Rights assigned
Having set up the account for the connector to access data, now we can move on to configuring Exchange.
Configuring Exchange
When we installed the Connector for Novell GroupWise earlier, we added a new proxy address generator. If you right click on the default (or any) Recipient Policy and switch to the E-Mail Addresses (Policy) tab, you should see a new GWISE address type as shown in Figure 19.
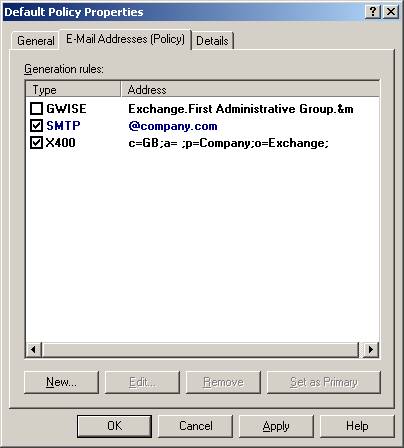
Figure 19: The Default Recipient Policy showing the GWISE address space
Notice the default GWISE address starts with Exchange which corresponds to the name of the External Foreign Domain we set up earlier. The GWISE address continues with First Administrative Group, and ends with &m which corresponds to the Exchange Alias. I suggest that you change the &m to &d that is generally a better option corresponding to the user Display Name.
The GWISE address policy is important, as the GWISE proxy addresses it generates will be synchronized into the GroupWise system, and it governs how the migrated users will appear in GroupWise. We will see this later in the article.
I will not go any further into Exchange recipient policy, except to say we need one to allocate GWISE proxy addresses, so either tick the box in the default policy, or create a new one. Hopefully by now you understand why the format of the proxy address is important.
Having set up the addressing, next we will move back to configuring the Connector for Novell GroupWise. Right click on it in Exchange System Manager (ESM) and on the General tab we firstly need to enter the API gateway path. Seeing as we are in a Windows world now compared to when installing the API gateway on the Netware server, we use the UNC path format.
In this case, it is \\NWGW1\Data\Dom1\WPgate\API.
We also set the Netware Account to use the account we created in eDirectory as shown in Figure 20.
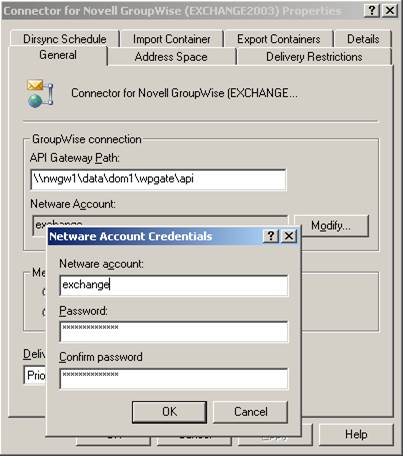
Figure 20: Entering the details for the Netware Account
Next, on the Address Space tab, Add… a GWISE address type, with a wildcard address (*) and a cost of 1. This will tell Exchange to send all mail with a GroupWise address over the Connector.
On the Import Container tab we are going to Create a new Windows user account when replicating a mailbox whose primary Windows account does not exist in the domain as shown in Figure 21. We are effectively using the Connector to provision our AD user objects. There are other ways to do this, but for the sake of simplicity this is by far the easiest.
One thing to note is that you may have to slacken your Password Policy in the Default Domain Policy because the Exchange Connector for GroupWise cannot create complex passwords. I would suggest you remove the requirement for complex passwords and set the minimum password length to 0 for simplicity, you can reactivate the password policy and change passwords later. Do not forget to run GPUPDATE /FORCE on the DC’s or wait +90 minutes before this new policy kicks in.
Press Modify… and choose where you want the new user objects to be created within Active Directory.
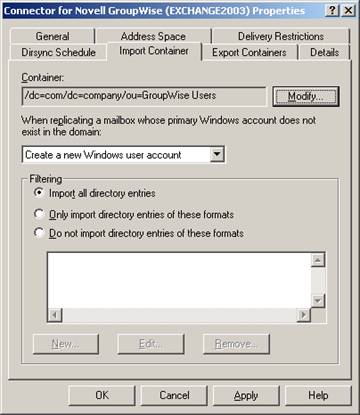
Figure 21: Selecting to create new AD users when importing
It is good practice to create two Organizational Units within AD, one for import and one for export, as we can then have more granular control over which Exchange objects we synchronize back to GroupWise.
One thing to note is that the containers on the Export Containers tab are explicit. If you add an OU it does not automatically process sub containers of that OU, you need to explicitly add each one.
Press OK to exit the properties page. You have now completed the connector configuration!
Summary
Having followed this series so far, you should now understand some of the theory about migrations, you will have installed the connectors which allow communication between GroupWise and Exchange and then configured them. In Part 4 of this series we will get the connectors up and running and talk about how to test if everything is working as planned. Perhaps more importantly, we will also show you what to do if it is not!
About co-author Declan Conroy
Declan Conroy is an IT consultant specializing primarily in Microsoft technologies including Exchange and Active Directory. Having previously worked for companies like Hewlett Packard and Compaq both as internal IT support, middle management and as a Professional Services consultant, Declan founded Cheddon Consulting Limited in April 2005. Since then Cheddon Consulting have migrated over 150,000 mailboxes to Exchange Server.
You can contact Declan here, or through his blog.
If you would like to read the other parts in this article series please go to:
- GroupWise to Exchange 2007 – Interoperability and Migration (Part 1)
- GroupWise to Exchange 2007 – Interoperability and Migration (Part 2)
- GroupWise to Exchange 2007 – Interoperability and Migration (Part 4)
- GroupWise to Exchange 2007 – Interoperability and Migration (Part 5)
- GroupWise to Exchange 2007 – Interoperability and Migration (Part 6)
- GroupWise to Exchange 2007 – Interoperability and Migration (Part 7)
- GroupWise to Exchange 2007 – Interoperability and Migration (Part 8)
- GroupWise to Exchange 2007 – Interoperability and Migration (Part 9)


