If you missed the first part in this article series please read Managing Hyper-V with SystemCenter Virtual Machine Manager 2008 (Part 1).
Introduction
In part 1 of this article, we installed and configured System Center Virtual Machine Manager 2008. Now it is time to start using it! In this article we will look at creating virtual machines and templates using VMM. Another important feature of a virtual infrastructure is the possibility to do a P2V (physical to virtual) conversion. We will compare certain features in VMM with features we find in VMware’s VirtualCenter.
Your first Virtual machine via the SCVMM management console
Creating a new virtual machine is very straightforward. Log on with the SCMM Admin Console and connect to your SCVMM server. On the right side, click the Actions=> New Virtual Machine link.
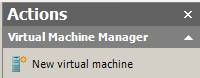
Figure 1: The new virtual machine actions icon
You can use an existing template or create a new virtual machine. Note the owner field: this becomes important when using the self-service portal, a feature that enables the Virtual Machine Manager (VMM) administrator to grant users permission to create and operate their own virtual machines within a controlled environment on a limited group of virtual machine hosts. The hardware profile is also something you can create and put in your library. A virtual machine is a combination of (at least) 2 components:
- The hardware profile (we compare it to the .vmx file as seen in VMware products).
- One or more hard disk or .vhd files(comparable to .vmdk files in VMware).
- The extra: a guest OS profile (compare it to the sysprep/template customization files generated and stored in VirtualCenter).
You can add/remove/edit all sorts of hardware components such as floppy drives, COM ports, extra hard disks, etc. One nice feature (and something that is missing in VMware’s VirtualCenter) is the ability to set the startup order of your Virtual Machine.
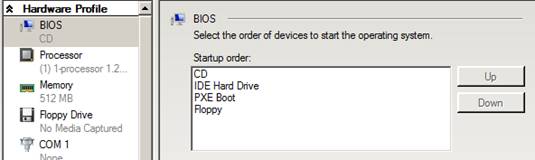
Figure 2: BIOS boot order is a very handy feature
By default, the virtual disk will be set to Dynamic. This is not ideal from a performance point of view as the disk continues to grow. We would suggest using the Fixed setting for production servers. When we look at a disk in the VMware ESX solution, this disk is by default fixed (this can, however, be changed on a per disk basis using the service console). By default, a hard disk is also an IDE device, not a SCSI device.
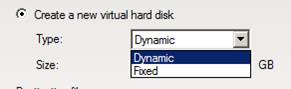
Figure 3: Make sure to select Fixed in a production environment
Note that a new virtual machine can be deployed to a host immediately or be saved in your library for future use. A concept that we know from VMware’s VirtualCenter, is the rating a hosts gets (in number of stars).

Figure 4: Star rating depending on (customizable) rating parameters
It is possible, by clicking on the Customize Ratings button, to tell your VMM how a Hyper-V host gets its rating. You can change what you think are important parameters.
- Load balancing – Host suitability is rated based on the intent to minimize the processing load on any one host.
- Resource maximization – Host suitability is rated based on the intent to consolidate multiple low-utilization workloads on a single host. Virtual machine placement in these cases involves determining the capacity limits for a particular host and placing virtual machines on that host until the limits are reached.
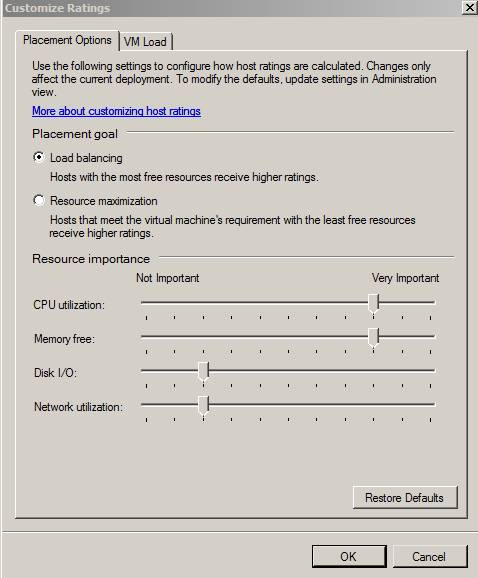
Figure 5: Placement options can be changed as you desire
Creating a Template
One of the nicer features of VMM is the ability to create a template or guest/hardware profile. You can create your “golden” Windows version and convert it to a template. There are two ways to create a Virtual Machine template. The first one is going to the library and clicking the New Template link on the right side to launch the template wizard. The other way to create a template is from an existing VHD that is already stored in the Library. Let’s see how it works!
Ok, first thing first: we need to create a Virtual Machine that can be used as template (our so called “golden image”). We decided to install a Windows Server 2008 x64 edition called “TemplW2K8x64” as a new guest.
Once this is done, it is time to run the new template wizard. The first step is selecting the source for the new template. In our example, we use “From an existing virtual machine currently located on a host” and we select the TemplW2K8x64 we just created.
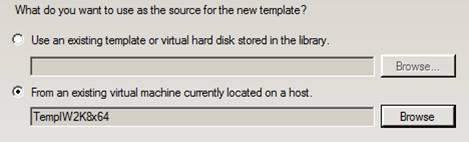
Figure 6: Select your source virtual machine
After configuring the hardware profile comes the interesting part: this is the guest operating system profile where you specify all OS relevant information such as product key, computer name, default password and domain joining rules. You can even insert your own custom sysprep file!
The template will be moved to the library once the wizard is completed. You will notice that our TemplW2K8x64 is “syspreping”

Figure 7: our template being “sysprepped”
The create template job will look similar to the one below:
Figure 8: Create template job overview
The new template will be ready for deployment and stored under VMs and Templates (which sounds reasonable enough)

Figure 9: Your golden image is now a template
Important note:
It is possible that the sysprep will fail if the local password policy on your golden image is enabled. Make sure the policy is set as seen in the screenshot below (no minimum password length and no complexity requirements):
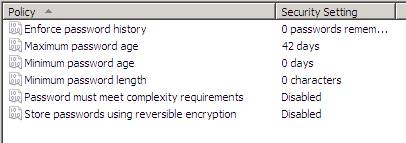
Figure 10: Local password policy disabled on Windows 2008
Creating a Virtual Machine based on a template
Let’s create a brand new virtual machine based on the template we created in the previous steps. Navigate to VMs and templates in the library view, right-click the template and select new virtual machine.
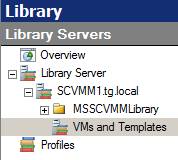
Figure 11: VMs and templates location
A wizard will guide you through the process. It looks essentially the same as the “normal” new virtual machine wizard with one exception: you now have the Guest Operating System step where you have to specify the computer name, the license keys, etc. This is only necessary if you want to change it, because the configuration is the same as when creating the template. A new virtual machine with a new SID (Security Identifier) and computer name will be deployed “automagically”. This process looks very similar to the way VMware’s VirtualCenter uses sysprep in the background to deploy virtual machine templates.
We did notice the same problem as when deploying templates in VirtualCenter: although our regional and keyboard settings in the template and in the Guest Operating System profile are set to Belgium (Dutch), the machine will use by default the English (US) default when booting. This is very annoying, especially when you entered a complex password with a different keyboard set.
P2V (Physical to Virtual conversions)
Built in to SCVMM is the ability to convert existing physical computers into virtual machines (called P2V or physical to virtual). This implies changing hardware from HP, Dell, IBM and other vendors to a uniform hardware platform (the virtual abstraction layer). Keep in mind that a P2V conversion is not that simple: some vendors like HP use custom software (Proliant Support Pack or PSP) and custom drivers (like HP software NIC teaming for example) that can impact your conversion. Other things to note is that you need the necessary rights to do a conversion and the (long) downtime (mind the software firewalls and AD Group Policies!).
You have two possibilities: performing an online or offline P2V conversion. In both cases, VMM temporarily installs an agent on the physical source computer that you want to convert.
- By using online P2V, VMM uses Volume Shadow Copy Service to copy data while the server continues to service user requests. The source computer is not restarted during the conversion.
- By using offline P2V, the source computer restarts into the Windows Preinstallation Environment (Windows PE) before VMM converts the physical disks to Virtual Hard Disks (VHDs).
Note that you can convert almost all versions of Windows (2000, XP, 2003, 2008) except Windows NT 4.0.
OK, let’s test the conversion wizard. In the right-pane you will notice a link/icon called Convert physical server. Click it, and a new wizard will appear. The process itself is very straightforward: just fill out the computer name and administrator user account. In our example, we will convert a management Windows 2008 server called MGMT1 that is a member of our domain tg.local.
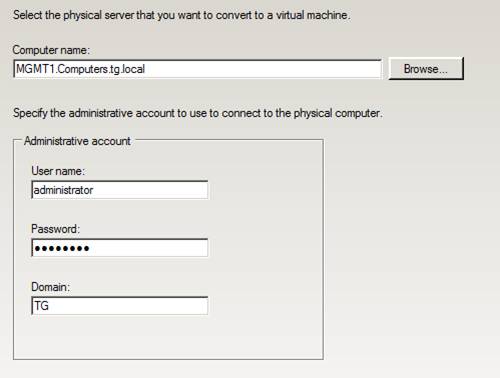
Figure 12: Selecting the soon to be converted physical machine
Note:
It is possible that you get the error in the screenshot below. There is a small bug that still needs to be fixed concerning DNS and FQDN. Just use the IP address instead of the DNS name.
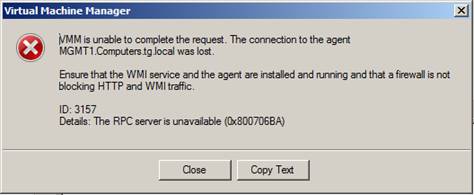
Figure 13: DNS bug error in VMM
Once the credentials are confirmed, SCVMM will try to install the agent (located in the folder c:\Program Files\Microsoft System Center Virtual Machine Manager 2008\agents) on the source system, so make sure your Windows firewall is not blocking it or you will get the error message in the screenshot below:
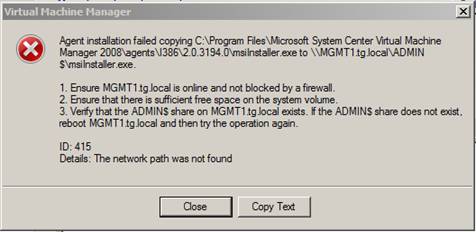
Figure 14: Windows firewall will prevent VMM from installing the P2V agent
Once this is done, you will get a nice overview of your OS, hard disks and network adapters. Then, in the next window, the P2V agent will check if it can find any problems (multiple NICs, etc.). In the next window you can select which volumes you want to convert, resize them and select the type and channel to be used. You also need to assign the number of vCPU’s to be used and the amount of memory. Finish the wizard and the P2V conversion will begin. Et voila! A new virtual machine is born.

Figure 15: Very important: hard disk options during the P2V process
VMware has its own P2V tool called VMware Converter (now integrated in VirtualCenter). This tool is very similar to Microsoft’s solution. But if you need real P2V power and advanced scheduling, 3rd party tools such as PlateSpin PowerConvert are highly recommended!
Conclusion
In part 2, we looked at how to manage virtual machines with VMM. Creating new virtual machines and using templates to deploy multiple virtual machines is very straightforward. P2V is another great feature, especially with both off- and online choices available.
If you missed the first part in this article series please read Managing Hyper-V with SystemCenter Virtual Machine Manager 2008 (Part 1).


