
When a Hyper-V admin needs to connect to a virtual machine (VM) console, they usually do so with a Remote Desktop client. This is also known as an RDP client. Although RDP clients have been used for decades, they aren’t perfect, particularly when displaying resolution issues. You may occasionally find that the Windows RDP client opens the VM console at a low resolution. That causes its desktop to cut off and you’ll have to use scroll bars to move around. Conversely, the console may open at a high resolution. Then, the desktop won’t fit on your monitor.
In this article, I’ll show you a simple trick to overcome these types of issues. Let me first back you up with some information about the display resolution set.
Where Is the Display Resolution Set?
The steps to adjust the Windows display resolution tend to vary slightly from one version of Windows to another. That said, the basic steps you’d typically take to adjust a machine’s display resolution include:
- Right-click on the Windows desktop.
- Select the Display Settings option from the shortcut menu.
- Use the Resolution drop-down to choose your preferred display resolution when the Display dialog box.
It’s worth noting, though, that this technique doesn’t always work in a Hyper-V environment. If you’re remotely connected to a Hyper-V server and you use the Hyper-V Manager to open a VM’s console, then you can set the VM’s display resolution in the usual way. As opposed to being remotely connected to a VM, this is an important distinction.
That said, if you remotely and directly connect to the VM through an RDP session, then the options to change the display resolution are disabled. This is unlike connecting to the Hyper-V server and using Hyper-V Manager to open the console.

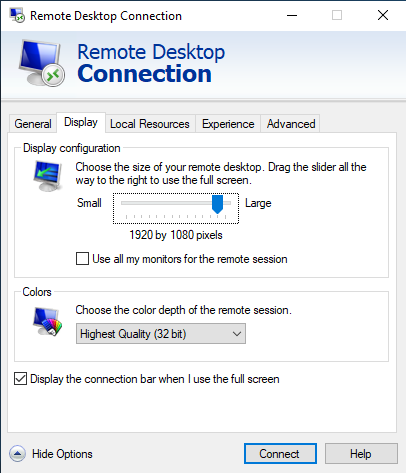
You can’t control a remote VM’s display resolution through Windows. That’s why you would ordinarily set the display resolution through an RDP client. To do so, follow these steps:
- Open the RDP client.
- Enter the IP address or name of the computer you want to connect to.
- Click Show Options.
- Select the Display tab.
- Move the Display Configuration slide bar to your preferred resolution.
- Click Connect.
As you can see, setting the display resolution is normally a simple and straightforward process. Problems can arise sometimes though. I’ll show you some examples next.
2 Examples of Resolution Problems
Any number of screen resolution problems can occur when remotely connecting to a Hyper-V VM. That said, two of these problems tend to be especially common. Here are these 2 problems:
1. Getting a New Monitor
Adding or removing a monitor can sometimes cause RDP display issues. In fact, this recently happened to me. The problem stems from the way RDP resolutions are tied to the client computer’s display settings.
If you look back at the previous screen capture, you can see the selected display setting is 1920 x 1080. The computer on which the screen capture was made is equipped with a 1920 x 1080 display. That means it wouldn’t make sense for the RDP client to offer higher resolutions.
It’s common for people who connect to the same remote systems on a frequent basis to save the RDP configuration to an RDP file. That way, they can launch a remote session, with all of the usual settings, simply by double-clicking on the file. This technique may come in as handy. That said, the display resolution settings are also embedded in the file. Certain changes can render those settings invalid.
In my case, I have a handful of RDP files I use to connect to remote systems. Recently, though, the 4K monitor I had attached to my desktop died. I didn’t have a comparable replacement. Instead, I connected an older 1080P monitor until I could replace the dead one. The temporary monitor worked fine. When I opened an RDP file, though, that file was configured to display the remote VM at a higher resolution than what my monitor could display. This resulted in the VM stretching beyond the boundaries of my screen.
2. Requiring a Specific Resolution
Another problem I occasionally encounter is that the RDP client doesn’t even offer the required screen resolution. If you look back at the previous figure, you’ll notice the Display Configuration slide bar contains several notches. Each notch corresponds to a specific display resolution.
On occasion, I record video courseware for various publishers. These videos have to be recorded at a very specific resolution as the publisher requires. The publisher’s required resolution isn’t always among the choices available on the slide bar though. Thankfully, you can work around this problem in 2 possible solutions. I’ll discuss each in detail in the next section..
2 Ways to Overcome Resolution Issues
If you find a remote session displayed at an unacceptable resolution, you’ve got 2 possible solutions, short of adopting a third-party RDP client.
1. Create a New RDP File
If the session was launched from an RDP file, the solution is simple. You can just delete and then recreate the file. To do this, perform these high-level steps:
- Delete the existing RDP file.
- Open the RDP client.
- Configure the session to your preferences.
- Click the Save button to create a brand new RDP file. You’ll find the Save button on the client’s General tab.
Of course, this solution only works if the RDP client lists your preferred screen resolution among the available choices. Otherwise, you’ll need to use the second solution.
2. Edit an Existing RDP File
The other solution to deal with RDP display resolution issues is to edit the RDP file. Incidentally, if you’re having problems using the RDP client to establish a direct session at your preferred resolution, then you should create an RDP file. You can do this using the previously listed instructions. Then edit the file to achieve your desired results.
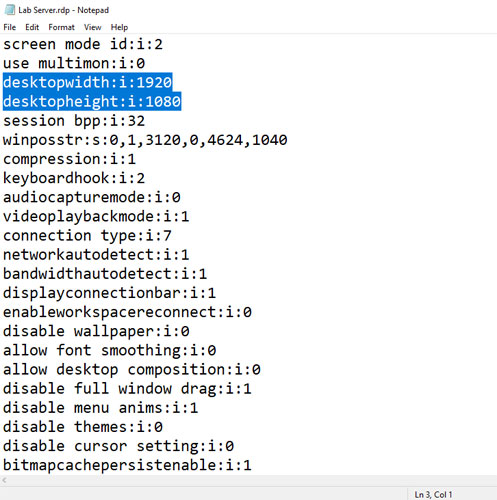
Editing an RDP file to fix a display resolution problem is easy. Here are the steps you need to follow:
- Right-click on the RDP file and then choose the Open With > Notepad options from the shortcut menu.
- Set the DesktopWidth setting to your preferred horizontal resolution.
- Set the DesktopHeight setting to your preferred vertical resolution.
- Save the file.
Final Thoughts
If you’re having display resolution problems using the Windows Remote Desktop client, then your best option to fix the problem is to create an RDP file. Once done, you can modify the file. That way, you can set the DesktopWidth and DesktopHeight to your preferred display resolution. I hope this article was helpful to help you overcome VM screen issues.
Have more questions? Check out the FAQ and Resources sections below.
FAQ
Is there an alternative to creating a separate RDP file for each connection?
Yes, you don’t have to create a separate RDP file for each VM. You can use Remote Desktop Connection Manager. This is a free tool from Sysinternals to manage all RDP connections. This helps keep connections more manageable and enables you to see which connections are active quickly.
Is the display resolution the only thing I can change when editing an RDP file?
No, you can modify nearly all of the connection’s properties from the options menu. For example, you can use the RDP file to enable local resources. Other properties include things like font smoothing and compression. Remember to also save your settings on the general tab if you reuse your RDP.
What happens if I delete the screen resolution settings from an RDP file?
If you’re using the default RDP client included with Windows, then deleting the screen resolution settings will cause the RDP session to default to full screen. You may wish to do this if you’ve changed your hardware setup or find it easier to work with the default resolution.
What should I do if I make a mistake when editing an RDP file?
If you catch your mistake early on, then don’t save your changes to the file. Close the file without saving and reopen it. If you’ve already saved the file and don’t know how to undo your changes, then you can delete the file. Then, recreate it from scratch using the RDP client.
What happens if I include an invalid setting in an RDP file?
The Windows RDP client ignores missing settings, misspelled settings, and out–of–range values. This is to stop the RDP program from incurring a fatal error. It’s possible that some invalid values may become problematic due to the RDP program’s reliance on them. Third-party clients likely behave differently.
Resources
TechGenix: Article on Remote Connectivity Solutions
Learn why the Microsoft client may not be your only RDP option.
TechGenix: Article on Microsoft RDP
Read more on Microsoft RDP for Web browsers.
TechGenix: Guide on Customizing the Microsoft RDP Client
Find out how to customize the Microsoft RDP client.
Microsoft: Remote Desktop App
Discover the Microsoft Remote Desktop app.
Microsoft: Documentation on Remote Desktop
Read about Microsoft’s Remote Desktop documentation.
Microsoft: Article on Remote Desktop Clients
Learn more about Remote Desktop clients.


