If you would like to read the other parts in this article series please go to:
Removing The Last Exchange 2003 Server From Exchange 2007 (Part 2)
Removing The Last Exchange 2003 Server From Exchange 2007 (Part 3)
Removing The Last Exchange 2003 Server From Exchange 2007 (Part 4)
In a previous article here on MSExchange.org, I covered the process required to correctly remove the first Exchange 2003 server that had been installed into an administrative group. There were several steps required to achieve this without breaking some functionality. A similar process needs to be undertaken in order to remove the last Exchange 2003 server from an organization that has been migrated to Exchange 2007. Tucked away in the release notes of the Release To Manufacturing (RTM) version of Exchange 2007, Microsoft detailed this process. That process has now made its way to the main Exchange 2007 documentation. In this article we’ll look at this process and go through the items in it to see how it shapes up, including plenty of screen shots as usual here on MSExchange.org.
As is normally the case with Exchange, there are many different possible configurations available to demonstrate and so it’s always a challenge to pick a configuration which appeals to a wide audience but at the same time isn’t overly complicated. Therefore, for this article I’ve taken the approach where a single Exchange 2003 server is coexisting with a single Exchange 2007 server which will obviously fit many situations. For larger systems, the same principles can be applied.
It goes without saying that the first thing you need to make sure of is that all user mailboxes have been migrated to the Exchange 2007 server. I won’t be covering the process of doing this within this article as I’ve already done that in a separate article here on MSExchange.org. However, personally I’m a big fan of ensuring that the new Exchange 2007 server is handling the production load as soon as possible. That doesn’t just include migrating the user mailboxes to it as there are other important roles the Exchange 2007 server can perform from the moment it’s made a production server. The first and most obvious is the handling of Internet email and so the remainder of this article will cover setting this up before we move on to other tasks in the next part. If you’ve already configured Internet email to be routed via Exchange 2007 you can skip this article, but I thought it useful to detail this process for completeness.
Internet Email
Most Exchange 2003 systems have a simple SMTP Connector configured to handle Internet email and so that’s the example I’ll be using within this article. A typical example is an SMTP Connector that simply has an address space of * and a cost of 1, meaning that the connector handles all SMTP email for any external SMTP domain. As a result of the coexistence between Exchange 2003 and Exchange 2007, it’s possible to see the SMTP Connector within the Exchange Management Console running on the Exchange 2007 server, where it appears as a Send Connector as shown in Figure 1.
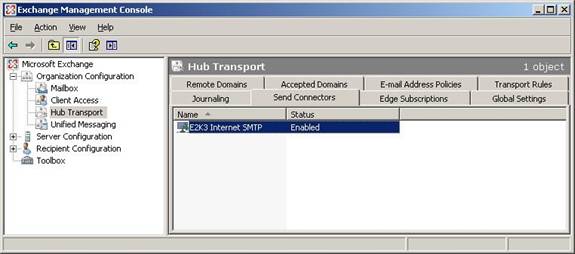
Figure 1: Exchange 2003 SMTP Connector
Logic may dictate that, since an SMTP Connector can have multiple source bridgehead servers in Exchange 2003, the Exchange 2007 server could be added as an additional bridgehead server in order to make the transition seamless. However, it’s not possible to add the Exchange 2007 server as an additional source bridgehead server via the Exchange System Manager or Exchange Management Console snap-ins as the Exchange 2003 and Exchange 2007 servers are in different routing groups. If you do try from the Exchange Management Console, you will get an error such as the one shown in Figure 2.
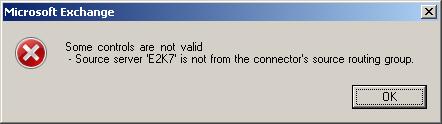
Figure 2: Exchange 2007 as Additional Bridgehead Server Error
Therefore, the correct way to ensure that all Internet email is handled by Exchange 2007 is simply to create a new Send Connector in Exchange 2007.
New Send Connector
Since the existing SMTP Connector has a cost of 1, it makes sense to raise this cost to, say, 10 before creating the new Send Connector. That way, the new Send Connector can be created with a cost of 1 meaning that it will be used in preference to the SMTP Connector. Of course, the alternative is to simply delete the SMTP Connector from Exchange System Manager once you’ve created the new Send Connector, thus ensuring that the only path available is via Exchange 2007. However, it’s always nice to leave old configurations in place until you are sure that the new configuration is working. Here are the steps required to create the new Send Connector:
- In the Exchange Management Console, expand Organization Configuration, click Hub Transport and then select the Send Connectors tab.
- Either right-click Hub Transport and choose New Send Connector… from the context menu, or choose the same option from the action pane.
- The New SMTP Send Connector wizard appears and consists of the following screens. I’ll briefly cover each screen and what you should enter.
– First up is the Introduction screen. In the Name field, give this connector a suitable name such as Internet Email. It may help to distinguish this name from the name of any existing SMTP Connectors hosted on Exchange 2003. In the drop-down list used to configure the intended use of the connector, choose Internet. The completed screen is shown in Figure 3.
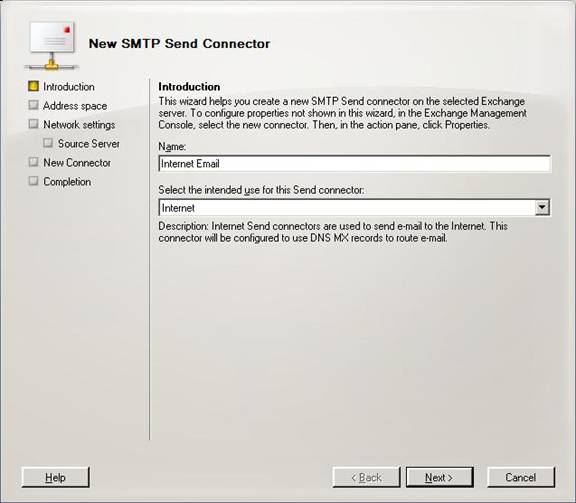
Figure 3: New SMTP Send Connector Introduction Screen
- Next is the Address Space screen where you simply need to click the Add button and in the resulting Add Address Space window, type the domain name to which you want to deliver Internet email. The most common domain name typed here is simply *, which represents all external domain names from your Exchange organization. Make sure the cost is lower than the cost of the Exchange 2003 SMTP Connector.
- The next screen is the Network Settings screen where you configure the Send Connector to either use DNS or a smart host to send Internet email. Here you’ll likely replicate the configuration of the Exchange 2003 SMTP Connector. In Figure 4 below I’ve used the IP address of a smart host which therefore assumes that the Exchange 2007 Edge Transport server role hasn’t been deployed. Don’t forget to ensure that your smart host allows connections from the Exchange 2007 server.
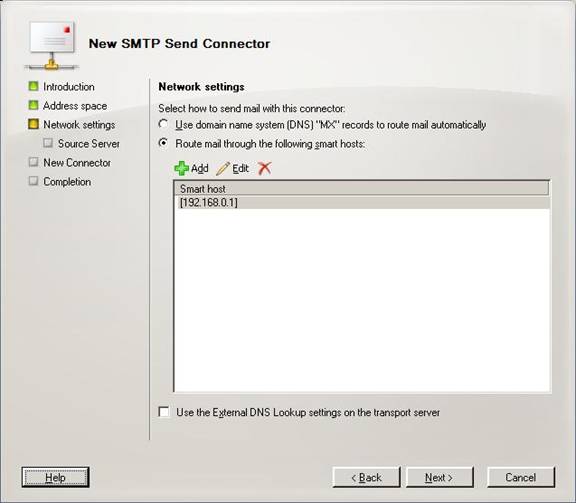
Figure 4: New SMTP Send Connector Network Settings Screen
- If you choose to route through a smart host the next screen that will be presented to you is the Configure smart host authentication settings screen. This allows you to specify any authentication options that your smart host may require such as basic or Exchange server authentication. In my case, no authentication is required so I just select None and progress to the next screen.
- Next the Source Server screen is presented as shown in Figure 5. Note that the Exchange 2007 server name is already populated in the list. In situations where you have more than one Hub Transport server, you can add additional servers via the Add button. The Source Server screen is shown in Figure 5.
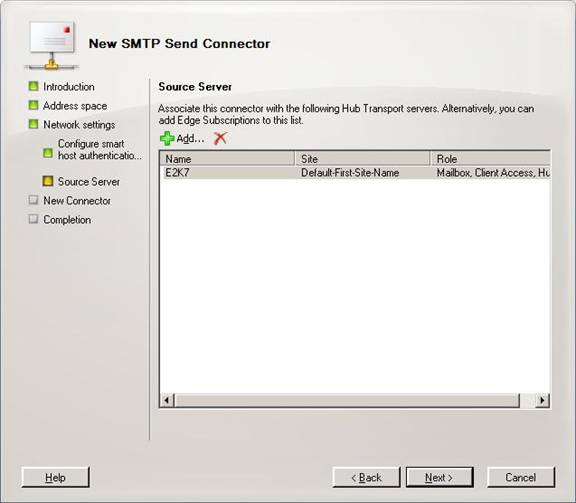
Figure 5: New SMTP Send Connector Source Server Screen
- The penultimate screen is the New Connector screen that allows you to review your settings. Clicking the New button then proceeds to create the new SMTP Send Connector, the result of which is then displayed at the Completion screen. At this point, you’ve now created a new SMTP Send Connector to handle Internet email.
As I mentioned earlier, this connector will handle ALL external email for domains other than those configured on your local Exchange 2007 server. This may not always be desirable. For example, if you have a private network link to a partner organization, you can create an additional SMTP Send Connector and specify the partner SMTP domain name in the address space field. This would be a more explicit match than the general * domain and therefore you can control message flow to this domain. In the Network Settings screen of this connector, you’d likely specify a different IP address for a different smart host.
Summary
This concludes part one of this article. In part two, we’ll complete the Internet email configuration by briefly looking at what is required to allow inbound Internet email and then we’ll move on to the steps required to move public folders from Exchange 2003 to Exchange 2007 as well as the process for moving the Offline Address Book generation to Exchange 2007.
If you would like to read the other parts in this article series please go to:
Removing The Last Exchange 2003 Server From Exchange 2007 (Part 2)
Removing The Last Exchange 2003 Server From Exchange 2007 (Part 3)
Removing The Last Exchange 2003 Server From Exchange 2007 (Part 4)


