If you would like to read the first part in this article series please go to:
- Rights Management Server and Exchange 2010 (Part 1)
- Rights Management Server and Exchange 2010 (Part 2)
- Rights Management Server and Exchange 2010 (Part 4)
- Rights Management Server and Exchange 2010 (Part 5)
- Rights Management Server and Exchange 2010 (Part 6)
- Rights Management Server and Exchange 2010 (Part 7)
- Rights Management Server and Exchange 2010 (Part 8)
Introduction
In part two of this article we installed the Rights Management Server (RMS) role, together with the other required server roles and features such as Message Queuing and Web Server, on the server named R-RMS. However, before we can start using the RMS features within our Exchange 2010 environment, there are still a number of configuration elements that need to be performed. These involve configuring or checking the Service Connection Point (SCP) record, setting relevant permissions on the RMS server and creating the ‘super users’ group. We will be covering those here in part three, so let’s get going.
Configuring Exchange Server Integration
If you read part two of this article, you may remember that we had come to the end of the RMS installation wizard. In the final screen of the installation wizard, we were advised to log off of the RMS server and log back in again before administering it. Although you do not strictly need to do this to make the first two configuration changes that I will detail below, we will also be covering a configuration change that needs to be made in the Active Directory Rights Management Services snap-in so you might as well log off and back in again now. Having done this, let’s now look at the three additional areas that we need to either check or configure before we can start using the various RMS features.
SCP Registration
First we need to ensure that the SCP is registered correctly. In Figure 15 in part two of this article series you saw that in the RMS installation wizard we elected to register the SCP. Although it has been registered, I’d recommend taking the time to ensure that this has been performed correctly as the SCP is important. This is because the SCP is used by the RMS client (such as Exchange in this case) to locate the RMS server. If you chose to register the SCP after installation, you will have to perform the steps below anyway. With that in mind, let’s use the Rights Management Server snap-in to examine the SCP. To do this, perform the following series of steps:
- Run the Active Directory Rights Management Services snap-in, found in the Administrative Tools folder.
- With the snap-in loaded right-click the server name at the top of the left-hand pane and choose Properties from the context menu.
- On the properties screen for the RMS server, click the SCP tab and you will be presented with a screen similar to the one shown in Figure 19.

Figure 19: Properties of the RMS Server - You can see from Figure 19 that the Current SCP field displays the SCP. In my lab environment, this is set to the URL listed below but it can be changed by selecting the Change SCP check box.
https://rms.neilhobson.com:443/_wmcs/certification
You can also use the ADSIEdit tool to check the SCP object in Active Directory. To do this, first run ADSIEdit.msc and then connect to the configuration naming context. Once connected, navigate down the tree to Configuration / Services / RightsManagementService and underneath you will see the SCP object. You can bring up the properties of this object and confirm that the URL is configured by examining the serviceBindingInformation attribute as displayed in Figure 20. In Figure 20, I clicked the Filter button that you can see in the bottom-right corner of the window and chose to display only those attributes that have a value set; this helps make the information easier to read.

Figure 20: Checking the SCP in ADSIEdit
Configuring Permissions
Once the SCP has been confirmed as registered, we need to configure permissions so that the Exchange 2010 server can integrate with the RMS server as, by default, it will not be able to do so. Specifically, we need to give two groups permissions to the RMS certification pipeline; these groups are named Exchange Servers and AD RMS Service Group. This is achieved by modifying the security permissions on the ServerCertification.asmx file that is stored on the RMS server. By default, this file is found in the \inetpub\wwwroot\_wmcs\certification folder. When you have located this file, bring up its properties and click the Security tab. The default permissions should look like those shown in Figure 21.

Figure 21: Default Permissions for ServerCertification.asmx
To add the Exchange Servers group, click the Edit… button that you can see in Figure 21. In the resulting permissions screen, click the Add button, type Exchange Servers into the object names field and then click the Check Names button. Make sure that the Exchange Servers group has the Read & execute and Read permissions as you can see in Figure 22.

Figure 22: Setting the Required Permissions
The same configuration, namely the Read & execute and Read permissions, needs to be granted to the group called AD RMS Service Group. However, note that this group is local to the RMS server and therefore make sure that you set the From this location field to the local server when in the Select Users or Groups screen as shown in Figure 23.

Figure 23: Selecting the Local Server
RMS Super User Group
The final area configuration area is the creation and configuration of the RMS ‘super user’ group. Specifically, we need to create a new group, add the Federated Email mailbox to that group, and then configure that group as the RMS super user group. I must point out that the group should be a universal distribution group. In my lab environment, I’ve created a group called RMS Super Users and mail-enabled it within the Exchange Management Console.
The adding of the Federated Email mailbox to this group is actually required to enable the RMS features in Outlook Web App; we will be looking at those features in another part of this article. Since I wanted to demonstrate this feature, I elected to perform this configuration step up front.
The Federated Email mailbox that I referred to is a system mailbox that will not be displayed in the Exchange Management Console. I have used the term Federated Email as a simplified name for this user account as you can see the rather more complex name in Figure 24. Note, though, that the GUID portion of the name of this account is always the same in any Exchange 2010 installation so this will make scripting the required changes very easy.
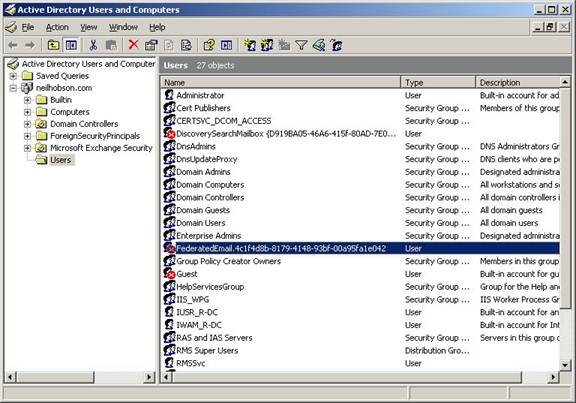
Figure 24: The Federated Email User Account Full Name
Since this user account and mailbox is not visible in the Exchange Management Console, we must use the Exchange Management Shell to add it to the RMS Super Users group. Here’s the command to use based on the fact that the super users group is called “RMS Super Users” in my lab environment:
Add-DistributionGroupMember –Identity “RMS Super Users” –Member FederatedEmail.4c1f4d8b-8179-4148-93bf-00a95fa1e042
Finally, we must set the super user group within the RMS snap-in as this feature is disabled by default. To do this, first load the Active Directory Rights Management Services snap-in if you haven’t already got it loaded, then navigate to the Security Policies object. Under this, you will see the Super Users object as you can see in Figure 25. Note the text advising you that super users is disabled by default.

Figure 25: Disabled Super Users
Right-click the Super Users object and choose the Enable Super Users option from the context menu. This feature will then be enabled as you can see from Figure 26, although no actual group has been configured at this time.

Figure 26: Enabled Super Users
To configure the super users group, click the Change super user group link and in the Super Users screen, click the Browse… button and enter the name of the super users group that was created earlier. This is shown in Figure 27. Once you’ve done that, you’ve completed the configuration of the RMS super users group.

Figure 27: Configuring the Super Users Group
Summary
That completes part three of this article series where you have seen that, once the RMS server role has been installed, there are still quite a few configuration steps that need to be performed before Exchange can successfully integrate with the RMS server. In part four we’ll take a look at testing the configuration and also look at how users can make use of the RMS features in OWA.
If you would like to read the first part in this article series please go to:
- Rights Management Server and Exchange 2010 (Part 1)
- Rights Management Server and Exchange 2010 (Part 2)
- Rights Management Server and Exchange 2010 (Part 4)
- Rights Management Server and Exchange 2010 (Part 5)
- Rights Management Server and Exchange 2010 (Part 6)
- Rights Management Server and Exchange 2010 (Part 7)
- Rights Management Server and Exchange 2010 (Part 8)