Having your sensitive business data fall into the wrong hands could spell disaster for your company. One of the greatest challenges within the IT community now is data-leaks from junked hardware. If a client finds their data isn’t as safe as they thought, word quickly spreads and a business can quickly become kryptonite.
In our own business, we recently had to decommission two business desktop PCs and one personal laptop. Due to this, it might be good to revisit the kinds of tools and processes you can use for sanitizing a drive. This doesn’t mean using hand sanitizer and a cloth, but thoroughly wiping data clean so it can never be recovered.
Before we get to the tools you’ll need, let’s take a look at what storage sanitization is!
What is Storage Sanitization?
Storage or data sanitization is the process of irreversibly destroying data stored on a storage device. Devices could be hard drives, flash memory, compact disks, or anything else. It’s important to use a technique that purges all data from the drive.
3 main types of storage sanitization exist; physical destruction, cryptographic erasure, and data erasure. These processes are used independently or together, which depends on what exactly is happening to the device. Let’s take a look at each one and some usage cases.
Physical Destruction
You’ll likely implement physical destruction for devices being disposed of. Before this, you’ll likely have to work to a company policy that requires either cryptographic erasure or sanitization to occur.
You’ll have to do this in front of a second party and paperwork produced for each device with a customary sign-off present from the voyeur. You can think of this process as a way to reduce your liability should a claim be made that you took the data and used it nefariously.
If you hand this process off to an accredited company, you’ll still need to conduct your storage sanitization prior. That’s because your data is only safe in your hands and no others. This is why if you like it or not, you’ll need defined processes that are explicitly documented and signed-off.
Let’s take a look at non-physical erasure and where you can use it.
Cryptographic Erasure (Drive Erase/Wipe)
You may already know that if you press ‘delete’ on data, it doesn’t remove it from a platter or discharge from logic in HDD and SSD devices respectively. In cryptographic erasure, you’re using a program to reshuffle data on the disk and jumble up the data in a random pattern. This process is similar to a drive optimization tool that moves blocks to new sectors to reduce ware in one location. In this process, an encryption algorithm is run, e.g. 128-bit. The larger the bit value, the harder it is to crack and the more times you conduct this process, the harder it’s to reverse engineer the data! Military standard (MIL-STD) processes use more shuffles than other corporate standards to help ensure that data can’t be pieced back together.
Today, even MIL-STD processes aren’t effective against researchers or recovery specialists. The number of cycles used can obfuscate what the data was, but it’s just a matter of time before data gets recovered. Security is about the time and effort needed to reach a solution. Here, it’s unlikely that most cybercriminals would be able to extract data from this process unless they had specialist knowledge.
The use case here is that this process may be good enough for physical destruction to take place after. It could be onsite or through a third party. This is because the turnaround on sign-off would unlikely permit data to be recovered in time, or the risk of the device coming in contact with a specialist could do this.
Let’s now look at data erasure to see the difference!
Data Erasure (Drive Sanitization)
Data erasers are much more time-consuming than cryptographic erasures, but they’re safer. It works at the binary level, and software writes data on-top of the data to be removed. Once the change in each binary location happens, it’s impossible to recover.
Data erasure can enable companies to resale their hardware to support environmental initiatives. You should make a mental note that you have to be careful here as many instances of IT professionals using cryptographic erasure occurred due to not fully understanding the difference between the two processes.
Why Do You Need Drive Sanitization?
Hardware has a product lifecycle like any other product. Most companies operate on a ‘cradle to grave’ mentality with new storage being purchased, used in service, and finally disposed of.
A storage device has a mean time to failure (MTTF) associated with its design. Most storage devices have reliable MTTF specified on the device which is based on product testing before product launch. This means that some companies won’t wait for the MTTF to be met and will schedule pro-active replacement procedures to reduce the risk of downtime.
No matter if the storage device is predicted to fail or has already failed, data must not get into the hands of cybercriminals, hackers, or other busybodies.
Some companies sell off their hardware that hasn’t failed in auctions to recoup some of the cost of the device. These sales are directed to people not savvy enough to realize that these devices are on their last legs or who don’t care if it fails. The challenge is, many IT professionals don’t sanitize their storage and rely on cryptographic erasure instead – putting an entire company, its clients, and supply chain at peril!
Hackers and cybercriminals with specialist data recovery expertise love this mistake. They’re happy at taking a punt at a hard drive on sale or nabbing them from destruction companies.
These cybercriminals will likely sell your companies’ sensitive data in underground markets for future extortion by others. They may also create contact lists to sell to marketing companies or a whole host of nefarious means. Client lists and a company’s intellectual property are the business moat for companies, failing to safeguard this can bankrupt them.
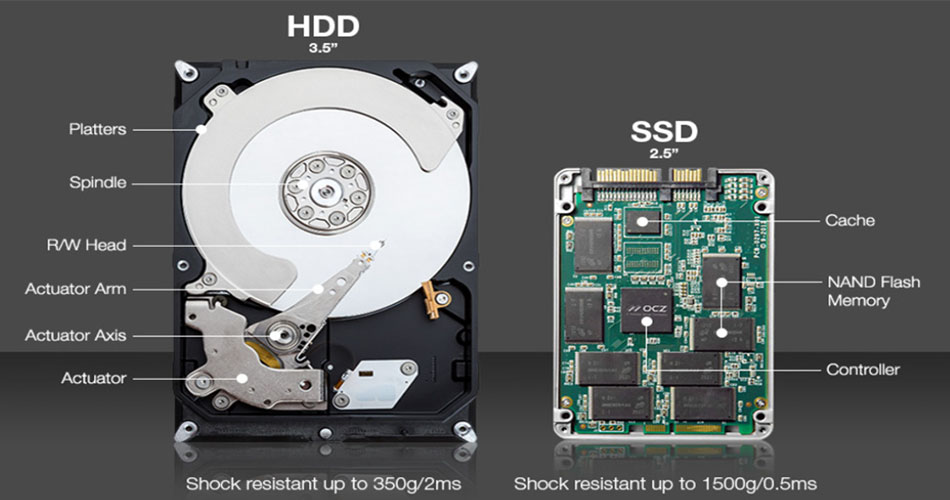
What’s the Difference between HDD and SSD?
It’s likely you know the differences between a HDD and SSD already. Here we’re interested in the differences of each in respect to ease of sanitizing a device. Let’s start with read-write speeds. The faster a device can read-write data, the quicker a sanitization process will take.
The sanitization steps are as follows:
- Pass 1: All addressable locations are changed to binary zeroes.
- Pass 2: All addressable locations are changed to binary ones.
- Pass 3: All addressable locations are changed to a random bit pattern.
We know that a HDD drive will be much slower due to the mechanical speed of the drive limiting the process. We also know data parsing is required for non-NVMe devices. As such, when you buy storage media, one consideration normally overlooked is how the storage size and speed will impact data sanitization after the drive has reached its specified service life.
Top 4 Recommended Tools for Sanitizing
You now know the theoretical processes, hardware, hardware limitations, and corporate policy requirements that need to be considered. Let’s next turn our attention to 4 of the best tools you can use to do what you need!
1. BitLocker
Some specialists state that you should just use BitLocker to encrypt the storage device and destroy the recovery key. The idea behind this suggestion is simple: it’s like locking the front door of your house and then throwing your key into the ocean. No one will be able to unlock your door and enter your house – though, of course, a battering ram would probably work.
This is why, in theory, no recovery key is available to the attacker since it’s safely stored in the (trusted platform module (TPM) chip. This means that, no way for them to recover data from the drive on the decommissioned PC exists.
BitLocker Drive Encryption is a built-in feature of Microsoft Windows that encrypts the contents of an entire drive to provide data protection. The purpose of this is to safeguard your data if your computer gets lost, stolen, or decommissioned.
BitLocker is most effective on modern machines that have a TPM version 1.2 or later chipsets. These are used to securely store the decryption key for the drive. That said, BitLocker can also work on legacy systems when inserting a USB flash drive that contains the decryption key to allow the user to decrypt the operating system volume at startup. While this approach is simple and effective, it suffers from 2 problems.
First, you haven’t actually wiped the data off the drive. That means that, if someday, somehow, someone finds a way to break BitLocker encryption, your precious personal or corporate data can potentially fall into the wrong hands. Fortunately, given the mathematical underpinnings of modern encryption algorithms, this scenario of course is highly unlikely.
Second and more importantly, if your business or organization stores or works with classified data, then following this approach for decommissioning your machine could land you in some serious legal jeopardy.
For example, if you work as a contractor with a U.S. federal government agency, then you must abide by the media destruction guidance specified by the National Security Agency (NSA) as detailed in NIST Special Publication 800-88 Revision 1.
A brief perusal of this document indicates that this ‘throw away your BitLocker key’ method isn’t allowed for such situations. That said, if you’re sure no classified data on your hard drive exists, then in most cases you’re probably OK with this approach to drive sanitization. This is unless you believe an Israeli cybersecurity company has secretly found a way of decrypting BitLocker-protected drives. You never know, they’re pretty smart over there!
You may also wonder if BitLocker can be used on other O/S like Linux or macOS. The answer is no, Microsoft designed it for its Windows systems and comes in a few flavors for different Windows O/S.
If you’re using Linux or macOS, a free open-source software VeraCrypt may fill your need! Also, many readers are probably shouting ‘what about dual boot systems!?’ The answer is BitLocker encrypts the entire drive, which means that it isn’t supported in these types of systems. If you have a drive already encrypted with BitLocker and you want to create a dual boot system, check out Dislocker.
Step-by-Step Guide to BitLocker
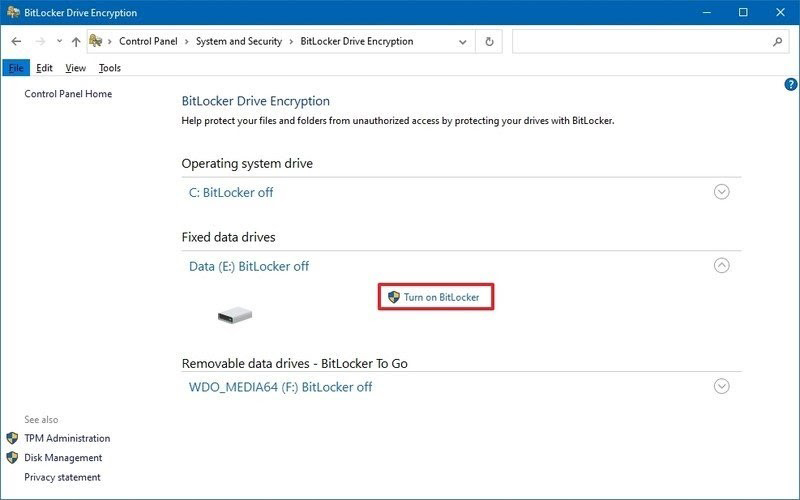
1. Open Start > Control Panel > System and Security.
2. Click on BitLocker Drive Encryption.

3. Select the drive you want to encrypt. In this example, we’ll select Fixed data drives. Next, click the Turn on BitLocker option.
4. Select, Use a password option and enter a password, repeat to verify.
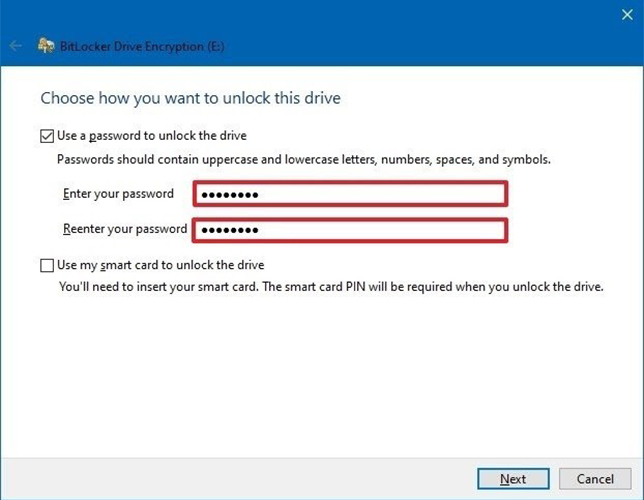
5. Click Next.
6. Select the option to save the recovery key to file > Next.
7. Follow through with the rest of the options and finish the encryption. Once complete, right click on the Drive icon in My Computer, then enter in the password to lock and unlock to check that it works. When you add an external drive, Windows normally prompts you if you’d like to enter a password without needing to look for the drive.
If you ever change your mind after setting up BitLocker go back to ‘Control Panel’ and select to turn off BitLocker next to the Drive icon.
This way, if you lose the password and you lock the drive or just remove it, you won’t be able to access the data – easily!
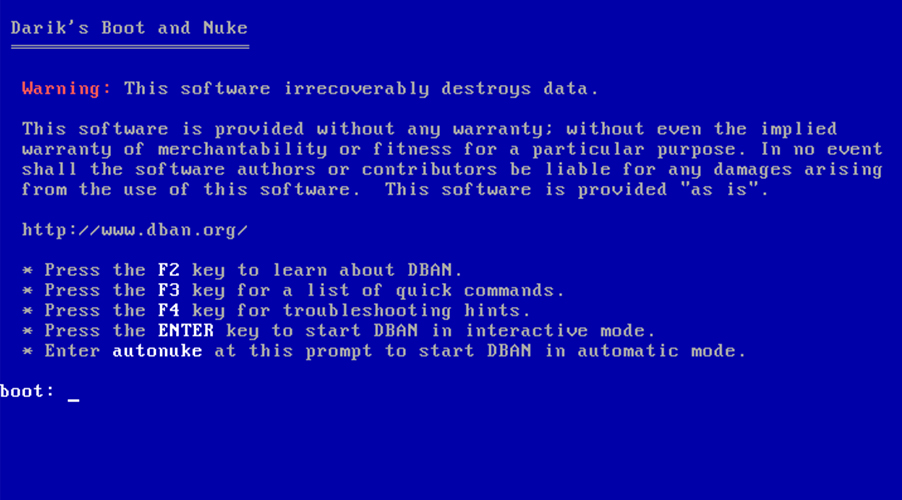
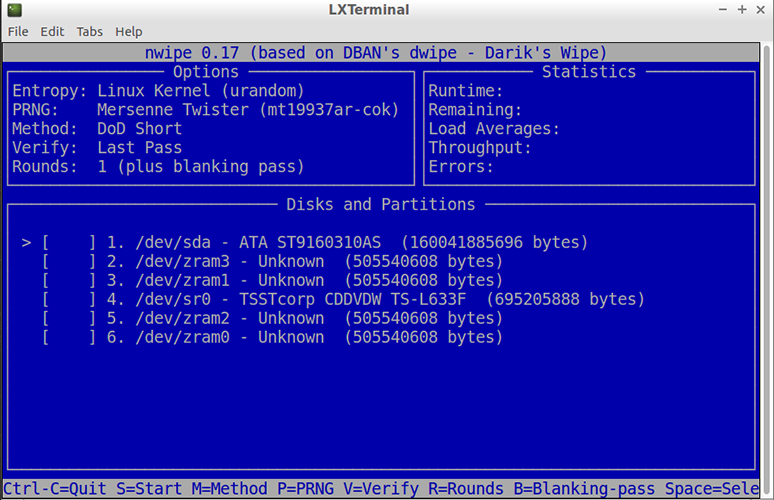
2. DBAN
Businesses and individuals have used a go-to tool called DBAN for many years to wipe HDDs clean before removal and disposal. It was originally called Darik’s Boot and Nuke. This was advertised as a comprehensive certified data erasure solution for companies and organizations.
It provides you with a self-contained boot image that wipes all the data off of the hard drive volume you target. DBAN is simple to use and has proven its effectiveness.
DBAN is also free to use, but no guarantee that data is completely sanitized across the entire drive exists. It can’t detect or erase SSDs. Some companies also require a certificate of data removal for auditing purposes or regulatory compliance which DBAN doesn’t offer.
You can find very little in terms of support! No hardware or customer support and software updates aren’t available using DBAN. This is likely because DBAN has been shelved as a commercial product and instead refers you to Blancco, a paid offering that can provide you with a certificate and erase SSD data! More about this offering later, but the benefit of DBAN is that it’s free and works well enough in certain circumstances.
DBAN was developed for Linux which means that it can find drives on a network that utilize other operating systems, but it may not find all of them depending on configurations. Another great thing about DBAN is that you can use it for unattended data sanitization.
Step-by-Step Guide to DBAN
First, you need to download it and it’ll come as an .iso file. This will require you to burn it to a CD or USB, so that you can boot with it.
Once ready, restart the computer in question and boot into DBAN.
Function keys are used to select options and are described on the DBAN screen. Note that you can use F2 to help find more information about the software and how it works before deciding to use it.
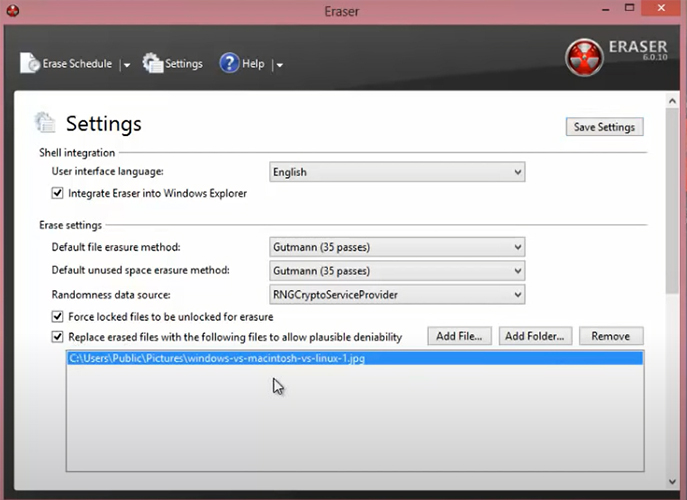
3. Eraser
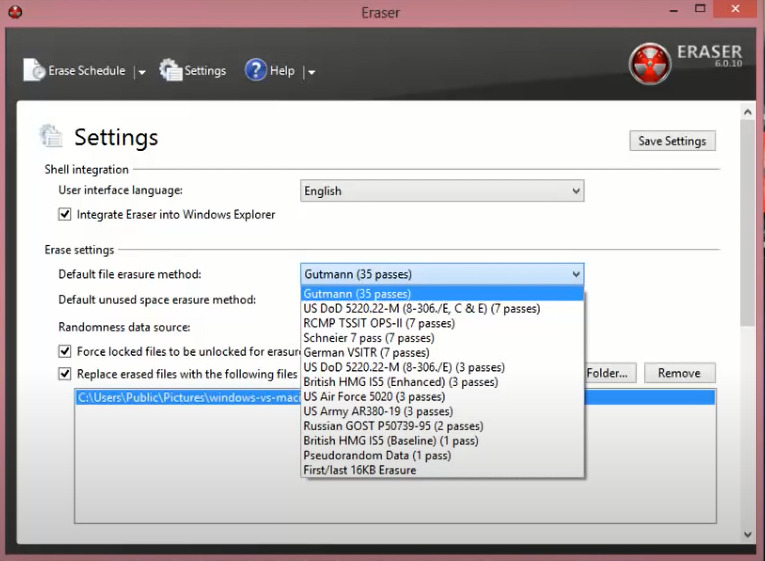
Some prefer to use Eraser to sanitize their SSDs. Eraser is a tool from Heidi Computers Limited based in Ireland. It’s a free software available together with source code under GNU General Public License. That said, it’s currently only supported on Windows-based operating systems.
Eraser allows you to create tasks and gives you better control of when you want to sanitize storage. It also enables you to select particular files, folders, and even unused space to erase. These features make Eraser far more useful than DBAN on a Windows O/S system.

Not only can tasks be scheduled, but an option to run it from a command-line interface (CLI) also exists. This enables administrators the ability to create scripts to run based on weekly or recurring tasks across an entire network. Eraser has the precision and control of a surgeon with enterprise-level capabilities.
DBAN is still useful in some businesses, but it’s a dinosaur compared to Eraser in terms of options and scalability.
Step-by-Step Guide to Eraser
Using Eraser is simple. You download and install it on a computer. Select the shortcut on the desktop to run it. The main window has 3 tabs, one to create scheduled tasks, the second is settings for what standard you want to run to destroy data.
It has an interesting tool that gives you the ability to replace deleted content with images. This is designed to reduce your risk of being blamed for deleting data intentionally. As this software is freeware, cybercriminals likely designed it to protect their activities against criminal proceedings. Don’t let that stop you from considering this tool as a useful utility though. The project is open source and you can check that nothing malicious is in the source code on SourceForge.
So what could compete with Eraser? Let’s turn our peepers towards Blancco, a paid and supported offering designed for enterprise usage.
4. Blancco
Blancco Drive Eraser is another utility that enterprises can use for securely removing all data from SSDs prior to disposing of or decommissioning them or the machines that contain them.
Blancco is actually advertised right on the DBAN official website due to its deprecation. It’s available in various versions including ones that provide you with a digitally signed PDF certifying removal of all data on the drives listed.
This is important since you can prove to your employer, insurer, or business partner that the drive has been successfully sanitized.
Blancco, unlike Eraser, is designed to provide enterprises with a total solution. You can even use it to assess and sanitize phones. In addition to end users, data centers, cloud-based storage, servers, and practically everything else that has storage in it can be sanitized.
This complete solution is important for larger corporations that need to reuse phones, mobile devices, and computers with staff turnaround. Also at the end of any hardware’s life, they can be sold off. This helps reduce running costs and improve the green credentials of the company.
Note that the remote data center or cloud sanitization is also a unique selling point for this software giving administrators as much power as possible to sanitize and secure anything!
Step-by-Step Guide to Blancco
Due to Blancco being a large enterprise-level platform, you can find very little information on how to use it. It’s likely specialist training days and manuals may be required for administrators to go through due to the number of features and options available.
Ask Your Vendor
Finally, if you need to wipe the SSD on a PC, it’s a good idea first to check with the vendor from which that particular SSD make and model has been sourced. That’s because some SSD vendors also provide utilities that can be used to securely erase all data from the SSD. Samsung for example bundles these types of utilities with every type of storage offering. When you get an SSD, check the paperwork that came with it and save it in a safe place – or check the website!
Final Thoughts
All of these sanitizing solutions can be used on Windows, with Linux and by extension, macOS being a little overlooked. This is because Linux and macOS distros have their own CLI commands tools that can be used. In fact, an administrator has much more control with Linux and macOS when it comes to cleaning the house. That said, it takes users a lot of training for them to understand what they’re doing and far out of the scope of this article.
Windows offers a user-friendly environment for people that don’t want to spend their life learning commands off by heart. This comes at the cost of having to use software and relying on the software logic and functions to work successfully.
Out of the 4 top sanitization tools, it’s difficult to define which is ‘best’ since they cater to different audiences.
BitLocker doesn’t sanitize anything but encrypts data, potentially giving you peace of mind before you physically destroy a drive or repurpose it inside the organization.
DBAN is old and works well on old systems in a down and dirty way that will likely become redundant soon. It’s lightweight, free, and will leave some data somewhere like a worn scouring pad!
Eraser is a hacker’s dream utility while also easy to use for home or small businesses. You can schedule tasks and have a sleek and easy to use interface. You also have precision on what you want to sanitize like files and folders. Neither DBAN nor Eraser have any support apart from Erasers community forum. Larger businesses won’t tolerate any software that isn’t actively patched or supported for security reasons. This could instantly rule this option out for you and DBAN.
Blancco is a true enterprise solution that handles any piece of hardware that has storage including remote data centers and leveraged cloud locations. Blancco enables you to reuse or resale hardware from mobiles, computers, and servers. It’s likely that the cost of this paid offering along with support offerings will pay for itself in larger ecosystems.
Sanitization isn’t just for security, but also allows you to improve the environmental impact of a company and recoup some dinero!
FAQs
What is physical destruction?
Physical destruction normally involves storage devices being crushed and ground up in a mangle. Small chips are normally left. If large enough fragments are left, then a remote chance that a data specialist could recover data from the drive exists. To mitigate this, using a software-based erasure process first is the best policy.
What is cryptographic erasure?
Data to be deleted are moved around on the device ‘randomly’ according to an encryption algorithm. The larger the bit encryption value, the less likely a specialist will be able to recover it. This erasure process isn’t infallible and researchers are always successfully cracking larger and larger encryption routines and publishing the process publicly in journal papers! This process can be useful for internal repurposing or internal physical destruction of a storage device. Don’t use it for external resale or third-party disposal.
What is data erasure?
Data erasure is the software-based process of rewriting each binary value on the media and it’s then impossible to recover data. This is vastly more time-consuming to complete than cryptographic erasure. That said, it allows a company to resell its hardware and support a company’s environmental policy.
Should I use a third party for physical destruction?
Your data is only safe with you. If you’re using a third party for physical destruction, ensure you use data erasure first.
Can I reuse hardware?
Yes, internally either software-based erasure process can be used. Externally use data erasure. If you can sell your hardware, it could help pay for new equipment.
What MIL-STD could I follow?
The US uses the ‘DoD 5220.22-M data wipe standard’ for data erasure. It details a 3-step process:
- Pass 1: All addressable locations are changed to binary zeroes
- Pass 2: All addressable locations are changed to binary ones
- Pass 3: All addressable locations are changed to a random bit pattern
As you can see this could be a very useful standard to base your company’s data disposal policy on!
Resources
TechGenix’s Website
If you’re interested in cybersecurity and other technology news, check out TechGenix’s Tech News here!
TechGenix’s Blogs
If you’re interested in blogs about erasing data or other useful nuggets of information, take a look here!
TechGenix’s Tutorials
Need to know what you’re doing in cybersecurity or the technology sector, click here!
TechGenix’s Reviews
TechGenix’s tech reviews are here to save you time and money on poor purchase decisions!
TechGenix’s Webinars
Looking at tutorials sometimes won’t give you what you need, dive into TechGenix’s webinars!
TechGenix’s Newsletter
Need all the latest tech and cybersecurity news summed up in a handy newsletter? Sign up here!


