If you would like to read the other parts in this article series please go to:
- What’s New in Windows 8 for Hyper-V Based Cloud Computing (Part 1) – Hyper-V Key Features
- What’s New in Windows 8 for Hyper-V Based Cloud Computing (Part 3) – Hyper-V Cloud Scenarios
- What’s New in Windows 8 for Hyper-V Based Cloud Computing (Part 4) – Hyper-V Storage Features
- What’s New in Windows 8 for Hyper-V Based Cloud Computing (Part 5) – Hyper-V Storage Scenarios
- What’s New in Windows 8 for Hyper-V Based Cloud Computing (Part 6) – Hyper-V High-Availability Features
- What’s New in Windows 8 for Hyper-V Based Cloud Computing (Part 7) – Hyper-V Continuous-Availability Scenarios
- What’s New in Windows 8 for Hyper-V Based Cloud Computing (Part 8) – Hyper-V Networking Features
- What’s New in Windows 8 for Hyper-V Based Cloud Computing (Part 9) – Hyper-V Networking Scenarios
- What’s New in Windows 8 for Hyper-V Based Cloud Computing (Part 10) – Hyper-V Disaster Recovery Features
- What’s New in Windows 8 for Hyper-V Based Cloud Computing (Part 11) – Hyper-V Disaster Recovery Scenarios
Hyper-V in Windows 8 Client
In Windows 8 client, Microsoft makes available the Hyper-V virtualization engine with the same core feature set found on Windows Server 8, as well as additional functionality that enables it to perform on a mobile platform.

The requirements to run Hyper-V on a Windows 8 client include a 64-bit processor platform with hardware virtualization and Second Level Address Translation (SLAT) support. With the exception of SLAT, the requirements are the same as those needed to run Hyper-V on Windows Server 8. The difference is that Hyper-V runs on Windows 8 client only if there is SLAT support, whereas it runs on Windows Server 8 without SLAT, but leverages it if available. SLAT support was made a requirement for Hyper-V on Windows 8 client to ensure performance of virtual machines (VM) on less optimum hardware platforms. For example, SLAT helps to prevent jitter in virtual machines that host graphic-intensive applications without a hardware GPU, and increases performance for applications that are highly memory intensive.
For an in depth explanation of SLAT and how it is leveraged in Hyper-V, read my article titled “Second Level Address Translation Benefits in Hyper-V R2”.
Hyper-V Core Features in Windows 8 Client
Microsoft’s implementation of Hyper-V on the Windows 8 client maintains virtual machine compatibility with Windows Server 8. This is essential when considering scenarios that require VMs to be developed and tested on Windows 8 client and then exported to Windows Server 8 for staging and production deployments. Table 1 provides a comparison of core Hyper-V features between Windows 8 client and Windows Server 8.
|
Hyper-V Features |
Windows 8 Client |
Windows Server 8 |
|
Running VMs |
1024 (Max) |
1024 (Max) |
|
Guest VM Memory |
512 GB (Max) |
512 GB (Max) |
|
Guest Virtual Processors |
32 per VM (Max) |
32 per VM (Max) |
|
Guest NUMA |
Y |
Y |
|
Guest VMs |
32 and 64-bit |
32 and 64-bit |
|
Dynamic Memory |
Y |
Y |
|
VHD and VHDX |
Y |
Y |
|
Guest VM Fibre Channel NIC |
Y |
Y |
|
Extensible Switch |
Y |
Y |
|
Wireless NIC |
Y |
Y |
|
Snapshots |
Y |
Y |
|
PowerShell |
Y |
Y |
|
Live Storage Migration |
Y |
Y |
|
VM Connection |
VM Console or RDP |
VM Console or RDP |
|
Sleep and Hibernate |
Y |
N |
Table 1: Hyper-V Core Feature Comparison in Windows 8 client and Windows Server 8
Memory, Virtual Processors, and NUMA Support
The number of supported VMs is 1024 combined with the ability to assign up to 512 GB of RAM and 32 virtual processors to each VM. Guest virtual machine processor and memory affinity with physical host resources is also supported on a non-uniform memory access (NUMA) architecture platform.
Hyper-V on the Windows 8 client also supports dynamic memory which helps to optimize the number of virtual machines that can execute concurrently, and allows the hypervisor to perform on-the-fly adjustments to virtual machine memory based on actual workload requirements. For more information on dynamic memory, read my article titled “Using Dynamic Memory in Hyper-V R2 SP1”.
Guest Support
A much-requested, but missing feature in Microsoft’s current virtualization client technology, Windows Virtual PC, is 64-bit guest VM support. In Windows 8 client, Hyper-V supports both 32-bit and 64-bit VMs, enhancing its value as a development and testing platform as well as expanding its ability to provide a better application compatibility platform. There is a path to migrate VMs from Windows Virtual PC to Hyper-V on Windows 8 client, and it requires that you uninstall Integration Components before moving the VMs.
Virtual Disk Format Support
Hyper-V in Windows client 8 supports both the standard VHD format for virtual hard disks (VHD) as well as the new VHDX format. The new VHDX format supports VHDs up to 16 TB in size, enables large sector support, and allows embedding user-defined metadata in a VHD. Although pass-through disks are still supported, the use of VHDX eliminates the need to use pass-through disks to meet large virtual disk storage requirements.
Fibre Channel Adapter Support
Another feature is the new virtual Fibre Channel HBA adapter provided for virtual machines. This enables new scenarios like guest clustering, use of MPIO, and other multipathing solutions for workloads that require high-performing SAN and application availability. This feature is available to Windows virtual machines running Windows Server 2008 R2 as well as Windows Server 8 versions.
Switch Extensibility Support
In Windows 8 client, there is also a new API that enables development of switch extensions to enhance the out-of-box Hyper-V functionality. The basic functionality of the Hyper-V switch enables the creation and configuration of external, internal, and private virtual networks, along with VLAN configuration. With the new API, vendors can provide pluggable switch modules that deliver additional network security, management, and monitoring features. The same version of switch extensions can support both Windows Server 8 and Windows 8 client. An example of a switch extension is the Cisco Systems Nexus 1000V which has recently announced support for Hyper-V in Windows 8.
Wireless NIC Support
A much needed feature for running Hyper-V in Windows 8 client on a notebook or laptop is support for wireless Network Interface Cards (NICs). This feature required a change to the virtual switch architecture to allow the routing of multiple MAC addresses (one or more unique MAC addresses for each VM, dependent on the number of virtual NICs connected in a VM) through a single physical wireless NIC for external network connectivity. In previous versions of Hyper-V (i.e., Windows Server 2008 and Windows Server 2008 R2 Hyper-V), only wired NICs are supported because multiple MAC address routing to external networks is achieved by placing the wired NIC in promiscuous mode, a function not supported for wireless NICs.
Windows 8 Hyper-V implements the Microsoft Bridging solution which implements ARP proxy (for IPv4) and Neighbor Discovery proxy (for IPv6) to replace a virtual NIC MAC address with the MAC address of the wireless NIC for those packets with an external network destination. Using an internal mapping table to match a virtual NIC IP address to the virtual NIC MAC address, this solution ensures the correct routing of external packets to/from the appropriate virtual NIC.
This solution requires that a bridge is created for an external virtual switch that is connected to a physical wireless NIC. Hyper-V first creates a bridge and connects it to the physical wireless NIC. Then, it creates the external virtual switch, and binds it to the bridge, instead of directly to the physical wireless NIC.
Snapshot Support
With the snapshot feature, Hyper-V allows you to capture the configuration and state of a virtual machine at any particular point in time, and to reload an existing snapshot within a matter of seconds. This feature is very useful in development and test environments to troubleshoot and debug problems.
Once a snapshot is created, all guest operating system, application, and data changes made during the execution of the virtual machine are stored in differencing disks. For each subsequent snapshot that is created, a new differencing disk (or multiple differencing disks if multiple VHDs are associated with the VM) captures the virtual machine changes. The differencing disks created for each subsequent snapshot are related in a parent and child hierarchy with the original VHDs as the top-level nodes.
Individual snapshots or entire snapshot hierarchies can be deleted or merged as needed. In fact, Hyper-V in Windows 8 client enhances past snapshot functionality through asynchronous merging of snapshots, and automatic reclamation of storage.
PowerShell Support
PowerShell allows you to automate the creation, deployment, and management of VMs. With 150 new cmdlets, you can automate all of the actions that are available in the Hyper-V Manager Graphical User Interface (GUI). PowerShell supports direct manipulation of VMs on a local host, as well as management of VMs on remote hosts.
Live Storage Migration Support
Hyper-V on Windows 8 client also provides Live Storage Migration to move virtual machine storage resources between physical storage units without VM service interruption. This feature allows VMs to be independent of underlying storage and supports directly-attached physical storage, removable storage like USB flash drives, SANs, and other remote file shares.
During a Live Storage Migration, you can choose to move some or all of the following VM files:
- VHD files
- Configuration files
- Snapshot files
- Second level paging files
In addition, you can specify individual locations for each selected virtual machine file, or move all the files to a single location. You should note that VM Live Migration (running state without service interruption) is not currently supported on Windows 8 client.
VM Connection Support
There are two options to connect to VMs running on Windows 8 client: VMConnect and the RDP client. VMConnect is the application that is used when connecting to a VM from within Hyper-V Manager. It enables you to connect to the VM starting at the boot phase, and provides management through a single monitor view with a 32-bit color resolution of up to 1600×1200.
The Windows 8 RDP client allows connection to a booted VM, providing a much richer experience. For example, using an RDP client connection from a physical computer with multiple monitors allows a VM to display on all the configured monitors. Through RDP, a VM can also take advantage of a multipoint touch interface, and other physical components like speakers, as well as attach directly to USB devices.
Sleep and Hibernation Support
Running on Windows 8 client, Hyper-V supports sleep and hibernation features. If a physical system is placed in sleep or hibernation mode, VMs are paused and their state information (memory and register state) is saved to files. When a system resumes, VMs are reallocated processor and memory resources, and their state information is restored from file to allow the VM to resume execution.
Enabling Hyper-V in Windows 8 Client
As mentioned previously, you can only enable Hyper-V on a Windows 8 client running on a 64-bit physical system that supports SLAT. In order to determine if your system supports SLAT, you can download and run a free tool, named Coreinfo, from the Microsoft site. Coreinfo was developed by Mark Russinovich, formerly of Sysinternals fame, who is currently employed at Microsoft on the Windows Azure team.
Determining System Compatibility
In order to run the Coreinfo tool, open a command window running within the Administrator context, and change directory to the folder where you stored the tool. Once you are in the appropriate directory, type the following:
Coreinfo –v
Using the –v switch, Coreinfo will only return information pertaining to the virtualization-related features of the system, including whether or not it supports SLAT (Figure 1.)
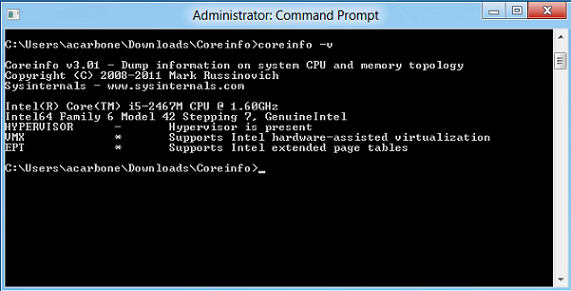
Figure 1: Virtualization Support Information from Coreinfo Tool
Coreinfo can also provide information on the system sockets, cores, core features, caches, NUMA nodes, and groups by using different switch options on the command line. You can view all the switch options by typing Coreinfo /? on the command line.
Hyper-V Configuration
Hyper-V is enabled on Windows 8 client using the Windows Features applet in the Control Panel. Use the following procedure to enable Hyper-V on Windows 8 client:
- From the Start page, select the Control Panel tile (Figure 2).
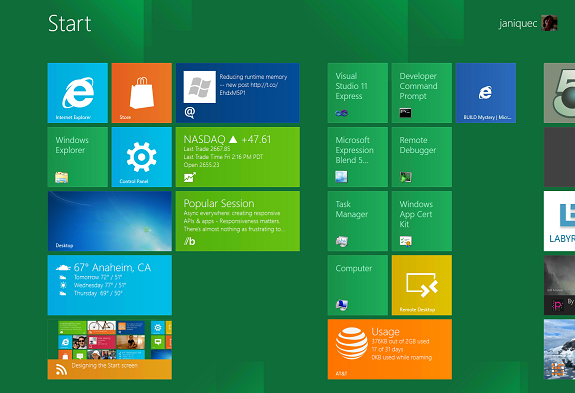
Figure 2: Windows 8 Client Start Page
-
In the Control Panel, select the More Settings option (Figure 3).
Figure 3: Windows 8 Client Control Panel Page
-
In the Control Panel window, select Programs (Figure 4).
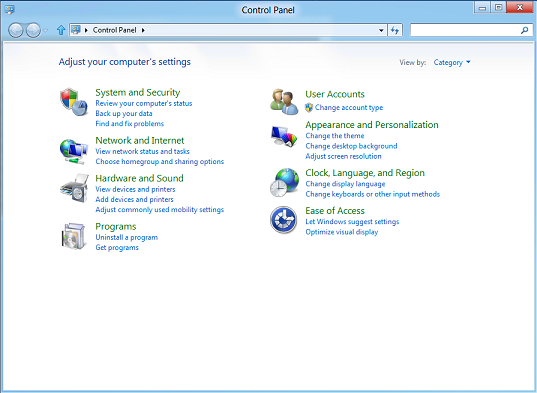
Figure 4: Windows 8 Client Control Panel Window
-
In the Programs window, select the Turn Windows Features On or Off option (Figure 5).
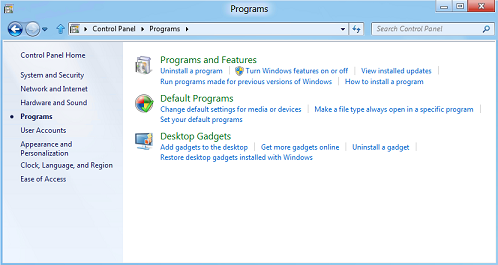
Figure 5: Windows 8 Client Programs Window
-
In the Windows Features dialog, expand and select the Hyper-V node, and then click OK (Figure 6).
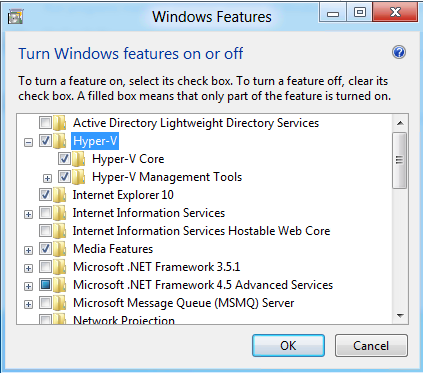
Figure 6: Windows 8 Client Windows Features Dialog
-
After the Hyper-V installation is complete, click Restart Now in the status window (Figure 7).
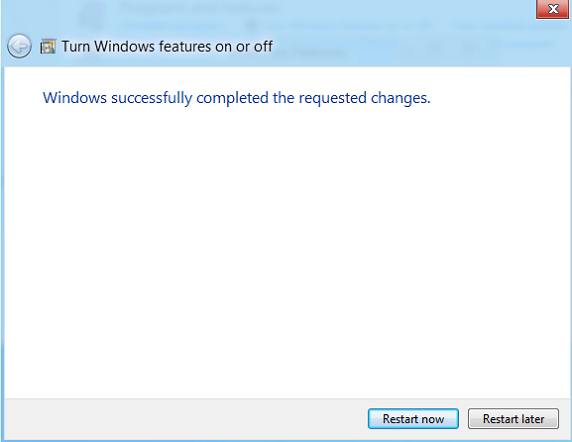
Figure 7: Windows 8 Client Hyper-V Installation Status
-
After the Windows 8 client restarts, the Hyper-V hypervisor is enabled, and the Hyper-V Manager tile appears on the Start page (Figure 8).
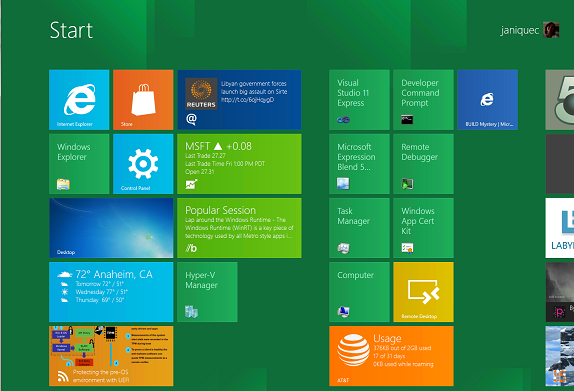
Figure 8: Windows 8 Client Start Page with Hyper-V Manager
Conclusion
In this article, you learned about the physical system requirements to support Hyper-V running on Windows 8 client, as well as the core feature set that Microsoft delivers to make it compatible with Hyper-V running on Windows Server 8. Using the free Microsoft Coreinfo tool, you can easily determine if your 64-bit computer has the SLAT support required for Hyper-V on Windows 8 client. Installation of Hyper-V is a simple procedure that is initiated through the Control Panel using the Windows Features applet. In Part 3 of this series, you will learn about the cloud scenarios that Microsoft supports with Windows Server 8, before learning in detail about the range of new storage, networking, and management features that make it a premier cloud platform.
If you would like to read the other parts in this article series please go to:
- What’s New in Windows 8 for Hyper-V Based Cloud Computing (Part 1) – Hyper-V Key Features
- What’s New in Windows 8 for Hyper-V Based Cloud Computing (Part 3) – Hyper-V Cloud Scenarios
- What’s New in Windows 8 for Hyper-V Based Cloud Computing (Part 4) – Hyper-V Storage Features
- What’s New in Windows 8 for Hyper-V Based Cloud Computing (Part 5) – Hyper-V Storage Scenarios
- What’s New in Windows 8 for Hyper-V Based Cloud Computing (Part 6) – Hyper-V High-Availability Features
- What’s New in Windows 8 for Hyper-V Based Cloud Computing (Part 7) – Hyper-V Continuous-Availability Scenarios
- What’s New in Windows 8 for Hyper-V Based Cloud Computing (Part 8) – Hyper-V Networking Features
- What’s New in Windows 8 for Hyper-V Based Cloud Computing (Part 9) – Hyper-V Networking Scenarios
- What’s New in Windows 8 for Hyper-V Based Cloud Computing (Part 10) – Hyper-V Disaster Recovery Features
- What’s New in Windows 8 for Hyper-V Based Cloud Computing (Part 11) – Hyper-V Disaster Recovery Scenarios


