Welcome back to part 2 of our series on Azure DevOps! In my last article, you learned how to set up a repository and create a build pipeline. In this article, you’ll learn how to set up an Azure release pipeline. I’ll also go over the environments, use cases, and how to build out a basic release pipeline.
After running a build pipeline you’ll have an artifact, which is your compiled code with all its dependencies and packages in one file that you can store and use later. That artifact is going to be the starting point for your release pipeline. The two pipelines are interconnected by the artifact, which is the output of the build pipeline and the input of the release pipeline.
Next, we’ll discuss how to build the release pipelines and environments. Let’s get started!
Let the Deployments Begin!
A release pipeline is used to get your application deployed in each DevOps environment. Like most environment setups, you’ll need to create pipelines for 4 environments: development, test, stage, and production. First, let’s talk about the environments before we get into the pipelines.
In any application development process, 4 development environments or stages exist. Breaking the application development process down will help you manage the project. It also helps track iterative changes and helps with version control.
Later in the article, you’ll see some visual representations of how the environments look. For now, let’s go over what they are one by one so that you have a better understanding of what each environment does.
1. Development
The development environment is where you work to build and test your own code. Developers have free reign over what they can do here as it doesn’t affect live sites or other teams. Code can be pushed to the next environment once it has fulfilled all the business requirements and gets an ok from the product owner.
2. Test
The testing environment hosts your developed code ready for testing by the QA team. In the test environment, you’ll be able to gauge the quality of the application from feedback. Testers and product owners also give feedback to the development team and request changes. Once you complete this stage the project goes to the staging environment.
3. Stage
The staging environment usually mirrors the production environment. Here you document the implementation process and make final checks before going live. Teams also review the application in the staging environment to see how it’s performing. Once ready you can book a time for implementation in the production environment.
4. Production
The production environment is your live system. This is the network your users will be interacting with. This environment is heavily guarded and you need to get approval from many stakeholders. You’ll also need to ensure firewalls are considered along with administrative privileges for the installer.
Now, let’s create your own release pipeline.
How to Set up a Release Pipeline
Now the time has come to set up a release pipeline. I’ll walk you through the steps you’ll need to take to get a basic pipeline set up.
On the release pipelines page go to new, and select new release pipeline.
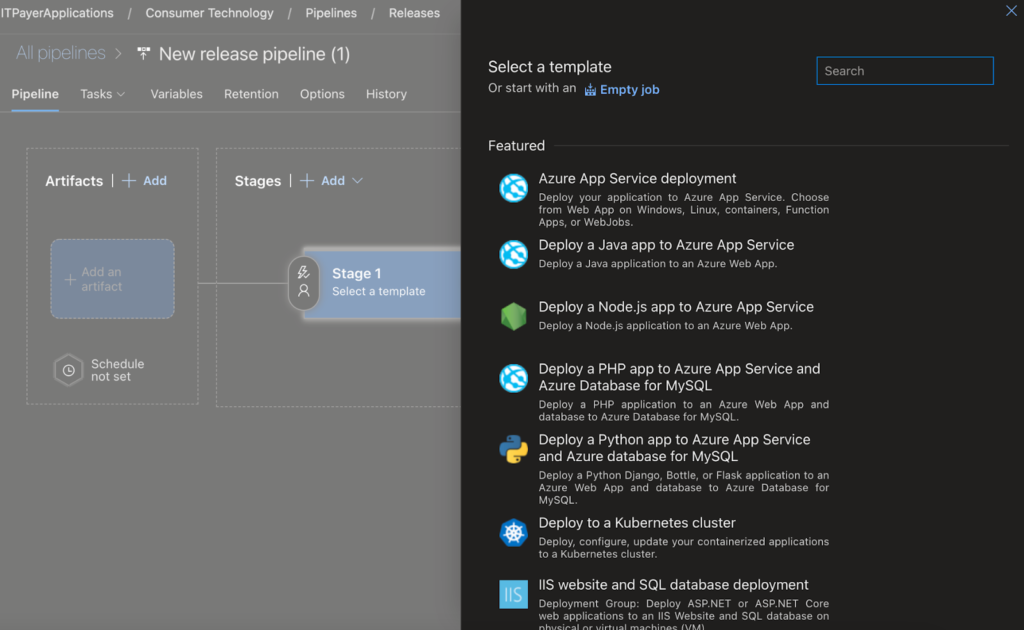
This screen will appear and you’ll have the option to use a template or create an empty job. Create an empty job. This allows you to see better the steps you’ll need for your release pipeline.
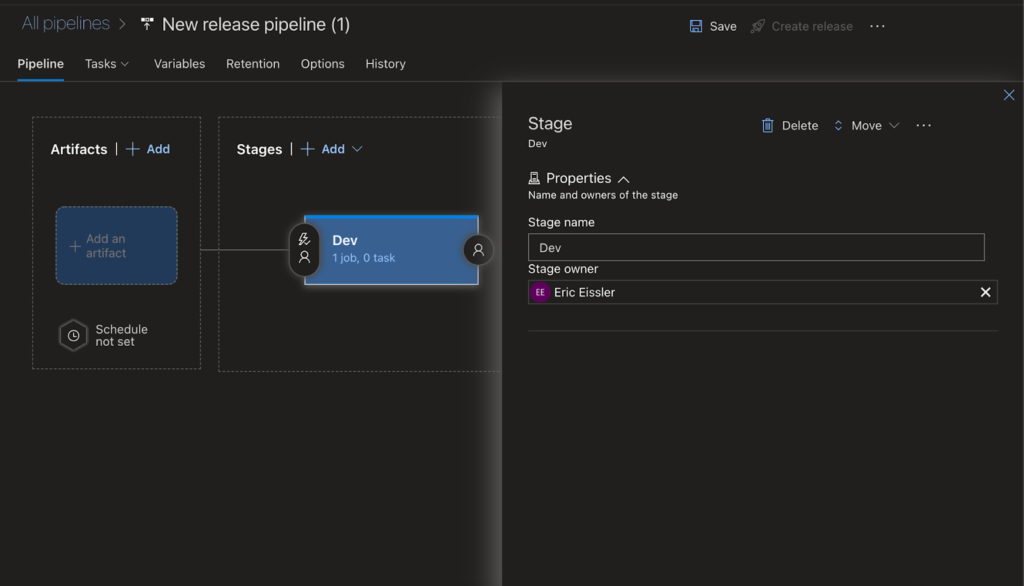
Next, you’ll see this page. Change your stage name to Dev and create 4 stages. You can add stages by clicking the add button next to stages.
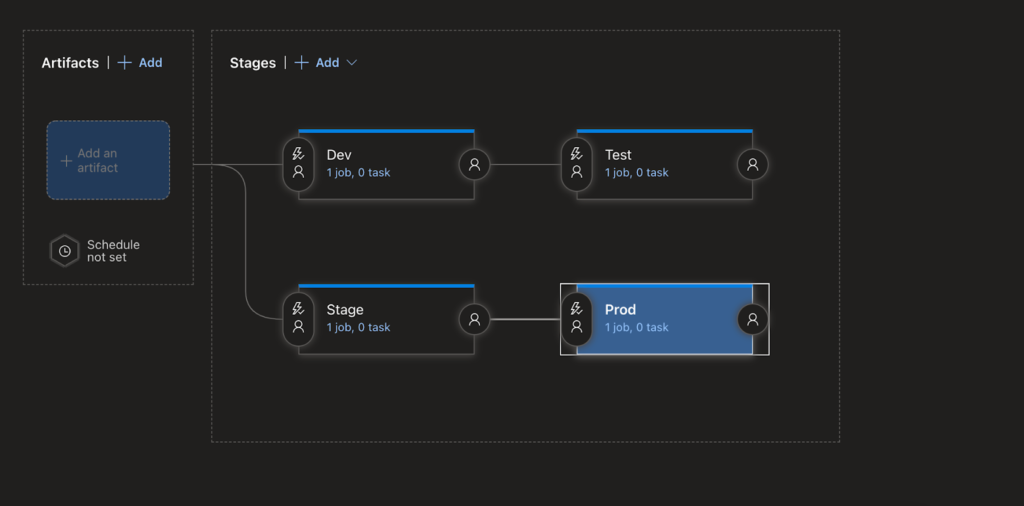
When you’re done, you should have a pipeline that looks like this. To get the stage to line up like in the above screenshot:
- Click on the oval button with the lightning bolt. See the image below.
- Go to the artifacts tab.
- Click add an artifact and a drop down will appear.
- Type the name of your Build Pipeline that you created in my previous article and it will auto populate and select that as your artifact.
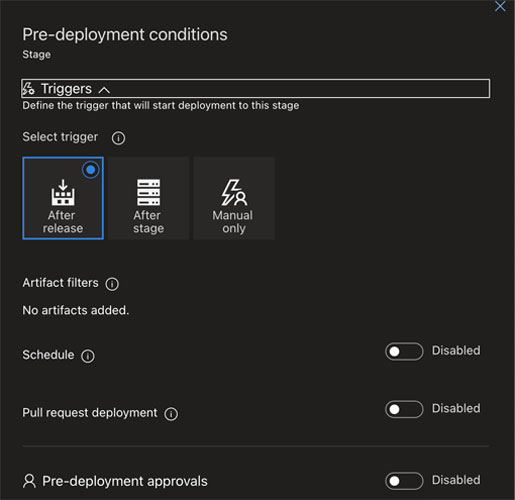
In the above screenshot, I checked After Release, which shifted Test down to a new line. ‘After Stage’ is the default.
You’ve now created your release pipeline skeleton! Next, you’ll need to add in some tasks. A simple task that you can use is Copy Files. This will take your files and copy them over to the specified server or cloud server.
The copy task is essentially the deployment. I’m not going to get into all the tasks here, but I’ll say that each environment will have its own pipeline. Each will have similar the same tasks. That said, your server names will be different. This is because each server is in a different environment.
Congratulations! You’ve now configured everything and have a basic release pipeline running.
Final Thoughts
In this article, you learned about 4 main software development environments. You also set up a basic release pipeline. In addition, you also took a build artifact and set it as the basis for your release pipeline. Finally, you created 4 environments with their respective pipeline.
In the next article, you’ll start setting up testing plans. In addition, you’ll discover what the QA teams can do with Azure DevOps pipelines. Finally, you’ll find out how testing suites work.
Have more questions about Azure DevOps pipelines? Check out the FAQ and Resource sections below!
Get The Latest Windows Server News
FAQ
Why does there need to be so many Azure DevOps release pipelines?
You need a release pipeline for each development environment. The more environments you have, the more pipelines you’ll need. You move your code to each environment using a pipeline. In most cases, you’ll also use the same task groups for all pipelines. Once you have a working task group you add this task group to each pipeline.
Why is no artifact produced from the Azure DevOps build pipeline?
To generate an artifact, you’ll need to run the build pipeline. This needs successfully completing to generate an artifact. Once your artifact is created, you can link it to your release pipeline.
Which is better in Azure DevOps: classical or yaml pipelines?
Classical pipelines aren’t the default pipeline, YAML is. In the case of classical pipelines, they have an easy-to-use UI. This means they can be easier to configure than yaml-based pipelines. You also don’t need to go to technical guides all the time for help. The downside is that a classical pipeline cannot be as open to the configuration as the YAML alternative.
Is there an auto deploy pipeline in Azure DevOps?
No, but you can set a timer to manually kick off a deployment at any given time. Ensure that you have the appropriate approvals checked off. Once you do, you can set it so that your release will run at that time. That said, the team will still need to be there for validation.
Can pipeline approvals replace formal change request documentation in Azure DevOps?
It’s unlikely. For any changes relating to production, most companies need to document the changes as a best practice. This process is slow and unnecessary, but it’s something you’ll need to put up with.
Resources
TechGenix: Part 1 Azure Devops: Setting up a Repo and Creating a build Pipeline Article
Check out the first article in this three-part series on getting started in Azure DevOps here.
TechGenix: Using Environment as Variables in your Release Pipelines Article
Learn more about using environment variables in your pipelines here.
TechGenix: How to Setup Azure DevOps for Blue/Green Deployments with App Services Article
Learn more about how to do blue/green deployments on Azure here.
TechGenix: Azure Blueprints: Building and Automating Better and Faster Deployments Article
Learn more about improving your deployments by using automation on Azure here.
TechGenix: Creating a Windows 11 Deployment Template Article
Learn how to create a Windows 11 Deployment template here.


Thanks for sharing. I absolutely loved your Article.