The vast majority of the Hyper-V virtual machines in the world are configured to use one or more virtual hard disks. It doesn’t have to be that way, though. Believe it or not, Hyper-V virtual machines can be configured to use a dedicated physical hard disk, which is referred to as a passthrough disk. How can a physical hard disk be dedicated to a virtual machine?
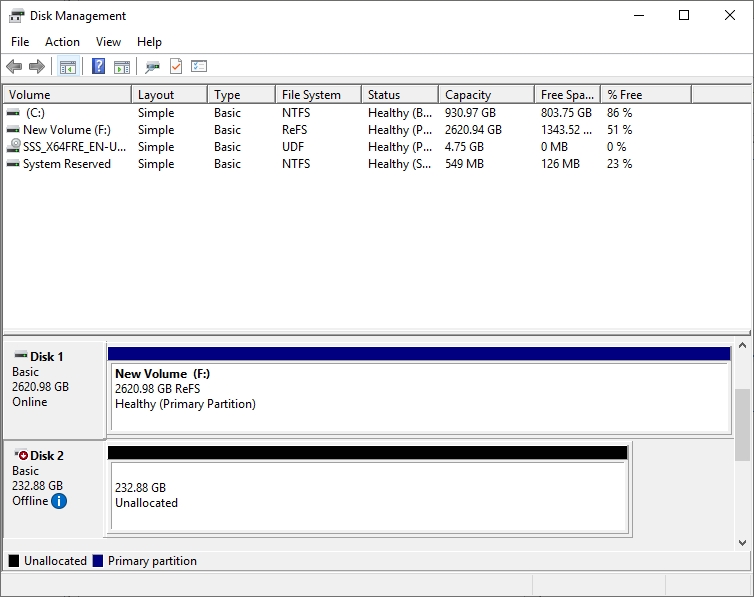
There are two main steps involved in configuring a Hyper-V virtual machine to use a dedicated physical hard disk or passthrough disk. The first step in the process is to enter the DiskMgmt.msc command at the host’s run prompt. This will cause the Hyper-V host to open the Disk Management console. Once the console opens, locate the disk that you want to dedicate to the virtual machine. Make sure that the disk does not contain any volumes, and then right-click on the disk and choose the Offline command from the shortcut menu. If you look at the figure below, you can see that Disk 2 is currently offline. This is the disk that I will use as a passthrough disk.
The next thing that you will need to do is to go into the settings for the virtual machine that you plan on linking to the disk. Next, go to the Hard Drive section, select the Physical Hard Disk option, and then select the hard disk that you want to use from the drop-down list. If you look at the next figure, you can see that my Hyper-V virtual machine is configured to use a physical hard disk.

Passthrough disk pros and cons
There are of course perfectly legitimate reasons why someone might want to bind a virtual machine to a passthrough disk. Some people claim that passthrough disks perform better than virtual hard disks because there is less overhead. I have also heard of people using passthrough disks to keep data isolated to a very specific location.
Regardless of any perceived benefits, there are some significant disadvantages to using passthrough disks. For starters, you can’t usually use a host-level backup to protect a VM that uses passthrough disks. These VMs must typically be backed up at the guest level.
Perhaps more importantly, passthrough disks cause mobility issues for the virtual machines that use them. Hyper-V replication does not work with passthrough disks, nor does the Checkpoint feature. A VM that uses passthrough disks can be live migrated, but there are heavy restrictions limiting the use of the Live Migration feature.
Migrating a passthrough disk
Even though passthrough disks are still an officially supported part of Hyper-V, I recommend using them only when absolutely necessary. The limitations caused by their use typically outweigh any benefit that might be derived by using them. Fortunately, there is a way to reconfigure your virtual machines to use virtual hard disks instead of passthrough disks. The migration process is actually relatively easy to complete. However, you have to make sure that you have enough free space to create a virtual hard disk that is at least as large as the physical disk that you are replacing. It’s also a good idea to back up the VM before you start. The migration process is usually safe, but it is always important to have a backup in case anything goes wrong.
So with that said, begin the process by shutting down the virtual machine. From there, select the virtual machine within the Hyper-V Manager, and then choose the New | Hard Disk commands from the Action pane. This will cause the Hyper-V Manager to open the New Virtual Hard Disk Wizard.
Click Next to bypass the wizard’s Welcome screen, and you will be taken to a screen that asks you to choose the disk format. You should choose the VHDX option unless you have a compelling reason to create a VHD-based disk instead. You can see the available options in the figure below.

Click Next and you will be asked whether you want to create a fixed-length, dynamically expanding, or differencing disk. Choose the Dynamically Expanding option and click Next. In case you are wondering, the Fixed Size option does deliver better overall performance, but it can be difficult to correctly size a fixed-length disk.
Now, specify a name and a location for the virtual hard disk that you are creating. Once again, you will need to make sure to save the virtual hard disk in a location that has plenty of free space.
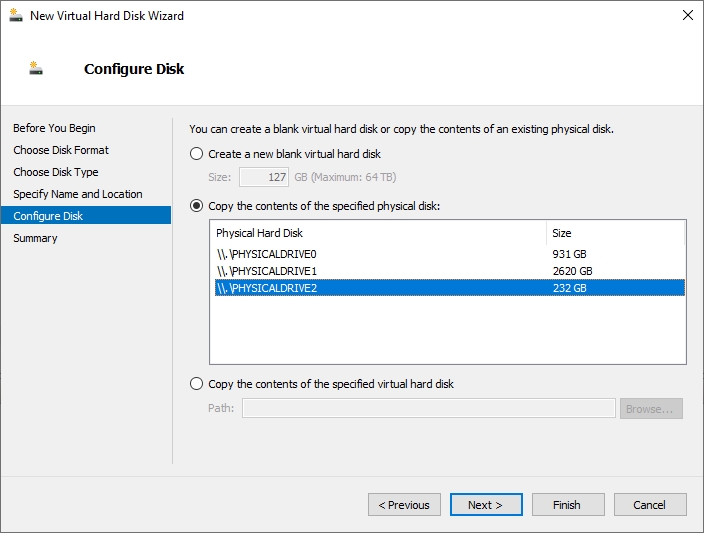
When you click Next, you will be taken to the all-important Configure Disk screen, which you can see below. Rather than manually specifying a disk size, choose the option to copy the contents of the specified physical disk, and then select the passthrough disk that you plan to replace.
Click Next one more time and you will be taken to a summary screen. Take a moment to make sure that the information displayed on the summary screen is correct, and then click Finish to begin the migration process.
Still some work to do
It is important to understand that the procedure that I have outlined in this article merely copies the passthrough disk to a virtual hard disk. To complete the migration process, you will need to configure the virtual machine to use the new virtual hard disk instead of the passthrough disk. To do so, go to the virtual machine’s settings, select the physical disk, and then click the Remove button, followed by the Apply button. Now, click on the SCSI Controller, select the Hard Disk option, and click the Add button. When prompted, choose the Virtual Hard Disk option, and then click the Browse button. Select the new virtual hard disk that you have created and click OK. You should now be able to boot your VM from a virtual hard disk.
Featured image: Shutterstock


I find it hard to believe with all the efforts that have been put into other ‘storage’ solutions for Hyper-V, we still have people talking about Passthrough disks……geesh!!!!!