If you would like to read the other parts in this article series please go to:
- Deep dive into rich coexistence between Exchange Forests (Part 1)
- Deep dive into rich coexistence between Exchange Forests (Part 2)
- Deep dive into rich coexistence between Exchange Forests (Part 3)
- Deep dive into rich coexistence between Exchange Forests (Part 4)
- Deep dive into rich coexistence between Exchange Forests (Part 5)
- Deep dive into rich coexistence between Exchange Forests (Part 6)
- Deep dive into rich coexistence between Exchange Forests (Part 7)
- Deep dive into rich coexistence between Exchange Forests (Part 8)
- Deep dive into rich coexistence between Exchange Forests (Part 9)
- Deep dive into rich coexistence between Exchange Forests (Part 10)
- Deep dive into rich coexistence between Exchange Forests (Part 11)
- Deep dive into rich coexistence between Exchange Forests (Part 12)
- Deep dive into rich coexistence between Exchange Forests (Part 13)
- Deep dive into rich coexistence between Exchange Forests (Part 14)
Introduction
In part 14, we set up an Exchange federation trust between Exchange forest 4 and MFG and Exchange forest1 and the MFG. Then we configured an organization relationship between the two Exchange forests. After we had performed the configuration steps necessary in order to have free/busy sharing working between the Exchange forests, we verified free/busy requests cross-forest worked from an Outlook client in both forests.
In this part 15, we will move on to configuring sharing policies between the Exchange forests. Sharing policies will allow users to share calendars and contacts cross-forest. Before we move on with sharing policies though, there’s some client version specific limitations I want to highlight.
Supported Client Scenarios
As I showed you in part 14, we can look up free/busy cross-forest as soon as an Exchange federation trust has been established with the MFG and an organization relationship is in place. This is even true without any form of GALSync in place. But when speaking the full Outlook client, this is only true when using Outlook 2010. If you use Outlook 2007 you must have GALSync in place since Outlook 2007 doesn’t support specifying the SMTP address of the user in the scheduling assistant. This is true no matter what the Exchange version running on the mailbox server storing the respective mailbox.
Does that mean I need to upgrade all my clients to Outlook 2010 if I don’t want GALSync? Yes if you want your users to request free/busy from an external Exchange forest using the Outlook client. But an alternative is to inform the users to use the Outlook Web App/Access client for this purpose.
If you have mailboxes on Exchange 2003 in one of the Exchange forests, it’s just the opposite. In this scenario you cannot use OWA to request free/busy data since OWA 2003 uses WebDAV to connect to the server holding the public folder database storing the Schedule+ Free Busy system folders. And since this has to be the Exchange 2010 server the connection will fail since Exchange 2010 doesn’t support WebDAV connections. So in this scenario you actually need to use Outlook to request free/busy data cross-forest.
Exchange 2010 Sharing Policies
So as mentioned shortly in the introduction, an organization relationship allows two Exchange forests to share free/busy data and nothing else. Sharing policies takes things a step further. With sharing policies, users within each Exchange forest can share their calendar as well as contact information with users in the other Exchange forest. They can do this in a similar fashion as to how they share their calendar with a colleague in the same Exchange forest. That is they can set permissions directly on the calendar, but they can also send out sharing invitations.
For the above to be possible, we won’t have to create a new sharing policy since Exchange 2010 Setup takes care of creating one automatically during installation. We can find it under “Organization Configuration” > “Mailbox” where there’s a “Sharing Policies” tab (Figure 1).

Figure 1: Default Sharing Policy created by Exchange 2010 setup
Let’s open the property page for this sharing policy and take a look at the settings. By default users are “only” allowed to share free/busy information. Also, the sharing policy applies to all domains.

Figure 2: Property page of the default sharing policy
Let’s click the “Edit” button. This takes us to the dialog box shown in Figure 3. As you can see we have several sharing options to choose from here. Since we are going to take a look at how all the sharing features that can be made available to a user, we’ll pick the last option “Calendar sharing with free/busy information plus subject, location, and body, Contacts sharing”.

Figure 3: Sharing levels available in the sharing policy
Now click on the “Mailboxes” tab. Here you can specify the mailboxes to which the sharing policy should be applied. We will select three test mailboxes (Figure 4) and click “OK” to exit the property page of the sharing policy.

Figure 4: Selecting the mailboxes to which the sharing policy should apply
Now switch over to the other Exchange forest and repeat the above steps.
Test the User Sharing Features Provided by the Sharing Policy
Let’s open a mailbox in one of the Exchange forests using Outlook 2010. In Outlook select the Calendar. Then in the toolbar click “Open Calendar” as shown in Figure 5. In the drop-drown menu select “Open Shared Calendar”.

Figure 5: Selecting Open Shared Calendar
Since we don’t have any GALSync in place between the Exchange forests we now need to specify the email address of the user in the other Exchange forest as shown in Figure 6.

Figure 6: Specifying the email address of the user
Since we do not yet have permission to open the specified users calendar, we are presented with the dialog box below. Click “Yes”.

Figure 7: You’re asked if a sharing request should be sent to the specified user
The Sharing Request message will appear and we can send it right away. Also select that the recipient should be allowed to view this calendar.
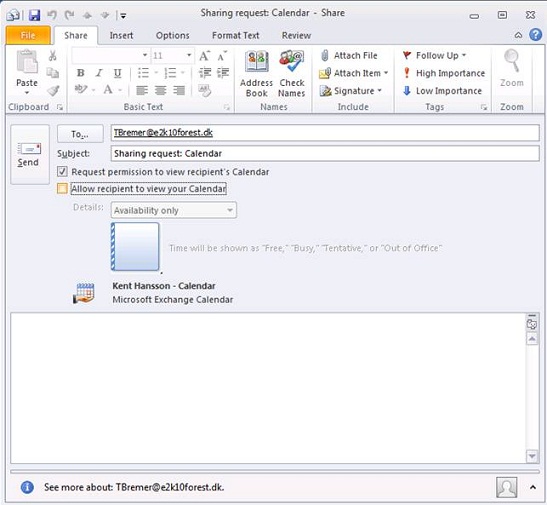
Figure 8: Sharing Request that will be sent to the recipient
Tick “Allow recipient to view your Calendar” and then in the details drop-down menu “Full Details”. Click “Send”

Figure 9: Selecting the details view
Click “Yes”.

Figure 10: Confirming you want to share full details with the recipient
Now open the property page for the sender’s calendar and click on the “Permissions” tab. Here we can see that the recipient of the sharing message has been assigned “Reviewer” permissions to the calendar.
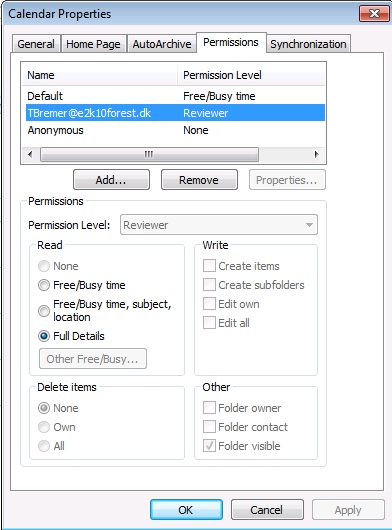
Figure 11: Reviewer permissions on calendar
Now switch over to the recipients mailbox where you should now see the sharing request message. Click “Allow” to let the sender get permissions
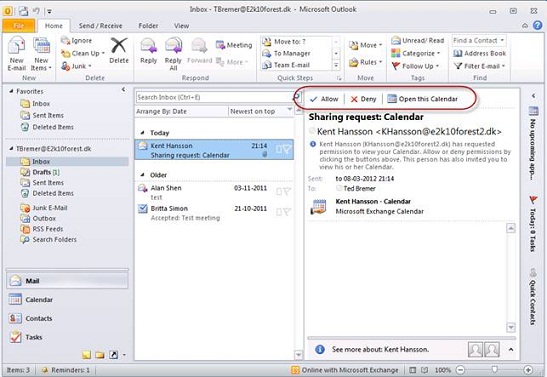
Figure 12: Sharing request in recipients Inbox
Again select “Full Details” and click “Send” to assign the sender/requester permissions to the recipient’s calendar.

Figure 13: Sending sharing request accepted message back to the sender
Again click “Yes” in the confirmation dialog box.

Figure 14: Sharing Confirmation
You will now be informed that the calendars has been shared.

Figure 15: Calendars shared
You can now click “Open Calendar” in the sharing request message and the calendar will be added to the shared calendar list in Outlook.

Figure 16: Selecting open this calendar in the sharing message
The calendar of the user in the other Exchange forest will now be opened.

Figure 17: Shared Calendar opened in Outlook
Okay we have now covered sharing calendars. Let’s take a look at how you can share contacts cross-forest. To share contacts click on “Contacts” in Outlook. Then in the toolbar click “Share” and then “Share Contacts” in the drop-down menu (Figure 18).

Figure 18: Sharing contacts
Similar to when we shared calendars, we can now allow the recipient access to local contact but we can at the same time also request access to the recipients contacts. When you have selected one or both, click “Send”.

Figure 19: Sharing contacts message
Click “Yes” to the confirmation dialog box.

Figure 20: Confirmation dialog box
Again the recipient receives a message where he can click “Allow” to allow sender to get read permission to his contacts and click “Open this Contacts folder” to view the shared contacts.

Figure 21: Sharing request for contacts
And we can see the other user’s contacts.

Figure 22: Shared Contact list
Okay we have now reached the end of part 15 which was also the last part in this article series on coexistence between Exchange forests. It was quite a task deploying this and writing 15 part revolving around this topic. But it was a fun journey most of the time. Hope you the reader enjoyed it as well.
If you would like to read the other parts in this article series please go to:
- Deep dive into rich coexistence between Exchange Forests (Part 1)
- Deep dive into rich coexistence between Exchange Forests (Part 2)
- Deep dive into rich coexistence between Exchange Forests (Part 3)
- Deep dive into rich coexistence between Exchange Forests (Part 4)
- Deep dive into rich coexistence between Exchange Forests (Part 5)
- Deep dive into rich coexistence between Exchange Forests (Part 6)
- Deep dive into rich coexistence between Exchange Forests (Part 7)
- Deep dive into rich coexistence between Exchange Forests (Part 8)
- Deep dive into rich coexistence between Exchange Forests (Part 9)
- Deep dive into rich coexistence between Exchange Forests (Part 10)
- Deep dive into rich coexistence between Exchange Forests (Part 11)
- Deep dive into rich coexistence between Exchange Forests (Part 12)
- Deep dive into rich coexistence between Exchange Forests (Part 13)
- Deep dive into rich coexistence between Exchange Forests (Part 14)


Thank you so much for the amazing articles series.
It help me a lot to in a cross forest migration 2013 to 2016 and another one 2010 to 2016.
This article is the much fully an clear article about rich-coexistence I found on the net.
You save my life.
Best regards