If you would like to read the other parts in this article series please go to:
- Deep dive into rich coexistence between Exchange Forests (Part 2)
- Deep dive into rich coexistence between Exchange Forests (Part 3)
- Deep dive into rich coexistence between Exchange Forests (Part 4)
- Deep dive into rich coexistence between Exchange Forests (Part 5)
- Deep dive into rich coexistence between Exchange Forests (Part 6)
- Deep dive into rich coexistence between Exchange Forests (Part 7)
- Deep dive into rich coexistence between Exchange Forests (Part 8)
- Deep dive into rich coexistence between Exchange Forests (Part 9)
- Deep dive into rich coexistence between Exchange Forests (Part 10)
- Deep dive into rich coexistence between Exchange Forests (Part 11)
- Deep dive into rich coexistence between Exchange Forests (Part 12)
- Deep dive into rich coexistence between Exchange Forests (Part 13)
- Deep dive into rich coexistence between Exchange Forests (Part 14)
- Deep dive into rich coexistence between Exchange Forests (Part 15)
Introduction
The purpose of this articles series is to show you how rich coexistence is configured between 3 separate Exchange forests with different versions of Exchange deployed.
There are various reasons for running multiple Exchange forests sharing the same GAL and availability information. One reason could be that company policies states that specific entities within a company must run isolated from the other entities. This is typically because of legal requirements. It could also be because of a merger or acquisition, where one company purchased another company or several other companies. The companies could continue to run isolated or be consolidated into one large Active Directory forest.
In this articles series, we pretend that a company acquired two other companies and want to provide a unified GAL and cross-forest availability information. This is a preparation for a consolidation project, where the two acquired companies need to be migrated to the acquiring company.
We will start out by preparing the infrastructure by enabling DNS name resolution between each forest as well as establish trust relationships between them. Then we will setup mail flow by configuring cross-forest connectors between the Exchange organizations.
After having prepared what can be considered the basics, we will move on and provide a unified global address list (GAL) experience using Forefront Identity Manager 2010 (FIM 2010) or more specifically the GalSync Management Agent included with FIM 2010. Moreover, we’ll configure cross-forest free/busy lookups using the availability service and the good old Microsoft Exchange Inter-Organization Replication tool (InterOrg).
Finally, we will also look at the options available when it comes to cross-forest calendar sharing both using the availability service and the Microsoft Federation Gateway (MFG).
Let’s get going. We have a lot of stuff to go through.
Lab Environment
First a quick overview of the lab environment that lay the ground for this articles series. As mentioned we have three Active directory forests.
Exchange forest 1
This Active Directory forest is based on Windows 2008 R2 and is our Exchange 2010 forest. All Exchange 2010 servers have the latest service pack and roll-up update applied. At the time of this writing, this is Exchange 2010 SP1 with RU5.
Domain: e2k10forest.dk
Subnet: 192.168.2.0/24
Forest Functional Level: Windows 2008 R2
Domain Functional Level: Windows 2008 R2
Servers in Exchange Forest 1:
- E2K10DC1 (Windows 2008 R2 64 bit Domain Controller, DNS and PKI server)
- E2K10EX1 (Windows 2008 R2 64 bit Exchange 2010 with CAS/HUB/MBX roles)
- E2K10EX2 (Windows 2008 R2 64 bit Exchange 2010 with MBX role)
- E2K7EX1 ((Windows 2008 R2 64 bit Exchange 2007 multi-role required for Exchange 2007 provisioning)
- E2K10FIM1 ( Windows 2008 R2 64 bit FIM 2010 server)
- E2K10IO1 (Windows 2003 R2 32 bit InterOrg server)
Note:
The Mailbox Server role is installed on the E2K10EX1 server as this is a requirement when using InterOrg to replicate public folder data (in our case free/busy data) to this forest. More about this will be covered when we configure InterOrg.
Exchange Forest 2
This Active Directory forest is based on Windows 2008 R2 and is our Exchange 2007 forest. All Exchange 2007 servers have the latest service pack and roll-up update applied. At the time of this writing, this is Exchange 2007 SP3 with RU5.
Domain: e2k7forest.dk
Subnet: 192.168.4.0/24
Forest Functional Level: Windows 2008 R2
Domain Functional Level: Windows 2008 R2
Servers in Exchange Forest 2:
- E2K7DC1 (Domain Controller, DNS and PKI server)
- E2K7EX1 (Exchange 2007 with CAS/HUB roles)
- E2K7EX2 (Exchange 2007 with MBX role)
Exchange Forest 3
This Active Directory forest is based on Windows 2003 R2 and is our Exchange 2003 forest. All Exchange 2003 servers have the latest service pack (SP2) and updates applied.
Domain: e2k3forest.dk
Subnet: 192.168.6.0/24
Forest Functional Level: Windows 2003
Domain Functional Level: Windows 2003
Servers in Exchange Forest 3:
- E2K3DC1 (Windows 2003 R2 32 bit Domain Controller, DNS and PKI server)
- E2K3EX1 (Windows 2003 R2 32 bit Exchange 2003 Front-end server)
- E2K3EX2 (Exchange 2003 Windows 2003 R2 32 bit Back-end server)
Exchange forest 4
This Active Directory forest is based on Windows 2008 R2 and is our Exchange 2010 forest. All Exchange 2010 servers have the latest service pack and roll-up update applied. At the time of this writing, this is Exchange 2010 SP1 with RU5.
Domain: e2k10forest2.dk
Subnet: 192.168.8.0/24
Forest Functional Level: Windows 2008 R2
Domain Functional Level: Windows 2008 R2
Servers in Exchange Forest 4:
- E2K102DC1 (Windows 2008 R2 64 bit Domain Controller, DNS and PKI server)
- E2K102EX1 (Windows 2008 R2 64 bit Exchange 2010 with CAS/HUB/MBX roles)
Each subnet (except the subnet associated with Exchange forest 4) is fully connected using a router and for the sake of simplicity, the Windows Firewall has been disabled on all servers in each forest. This means there are no blocked ports per se between the forests and therefore any server in the 3 forests.
Exchange forest 4 is completely isolated from the other forests and can only access Exchange forest 1 over the Internet as we will test cross-forest availability between Exchange forest 1 and 4 using the Microsoft Federation Gateway and the Exchange 2010 Federation features. This also means we won’t perform the DNS steps in the next section for Exchange forest 4.
Below is a conceptual diagram of the Exchange multi-forest topology.

Figure 1: Conceptual diagram of the multi-forest topology
Enabling DNS name resolution between Forest
The first thing we want to do is to enable DNS name resolution between the forests. This can be achieved using three different methods
- Secondary Zones – You can replicate DNS records from one forest to another using replication using read-only secondary zone.
- Stub Zones – You can use so called stub zone, which is similar to a secondary zone but no DNS records is replicated to a stub zone except a SOA record, NS records for all names servers and A records for all name server.
- Conditional Forwarding – We also have conditional forwarding with which you can have the query forwarded to the respective domain based on the FQDN queried.
Conditional forwarding is my preferred method in these kinds of scenarios, and the one we will use in the articles series.
To configure conditional forwarding in Exchange forest 1 (Exchange 2010), we’ll need to logon to the Domain Controller and launch the “DNS Manager”. In the “DNS Manager”, right-click on the DNS server object (E2K10DC1 in this example) in the left pane and then select “Properties” in the context menu.

Figure 2: Opening the property page for the DNS server in Exchange Forest 1 (Exchange 2010 Forest)
On the property page, click the “Forwarders” tab and then “Edit” as shown in Figure 3.

Figure 3: Forwarders tab
Under “Edit Forwarders”, enter the IP address of the Domain Controller in forest 2 and forest 3 and hit enter. They will then be resolved to the server FQDN (Figure 4) and you can click “OK”.

Figure 4: Adding Domain Controllers from the other forests as forwarding servers
Back on the main screen of the “Forwarders” tab, you can see the Domain Controller for each forest listed. Click “OK” to exit the property page and then close the “DNS Manager”.

Figure 5: List of forwarding servers
Now open a command prompt and verify that you can ping all servers in each forest using the server FQDN.

Figure 6: Verifying servers in other forests can be pinged using the server FQDN
Now log on to the Domain Controller in Exchange Forest 2 (Exchange 2007 Forest) and perform the same steps as above with the only exception being you replace the Domain Controller in Exchange Forest 2 (Exchange 2007) with the Domain controller in Exchange forest 1 (exchange 2010 Forest) as shown in Figure 7.
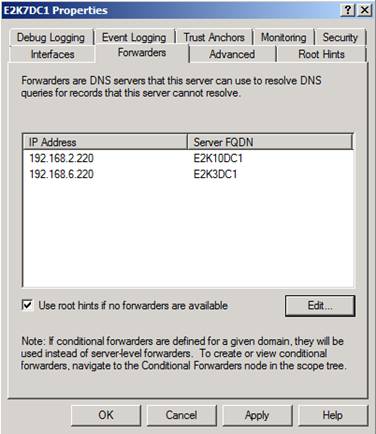
Figure 7: List of forwarding servers
Again, make sure you can ping all servers in the two other Exchange forests using the server FQDN.
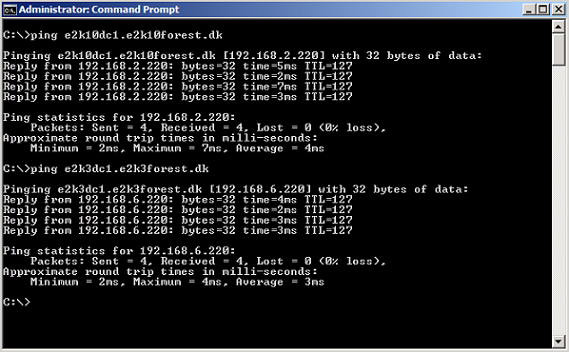
Figure 8: Verifying servers in other forests can be pinged using the server FQDN
Let’s move on to Exchange Forest 3 (Exchange 2003 Forest). Logon to the Domain Controller and then launch the “DNS Console”. Since this is a Windows 2003 R2 server, the way you configure conditional forwarding is slightly different than how we do it in Windows 2008 R2.
Right-click on the DNS server object in the left pane, then select properties in the context menu as shown below.

Figure 9: Opening the property page for the DNS server in Exchange Forest 3 (Exchange 2003 Forest)
Then click the “Forwarders” tab. As you can see this looks quite different from how conditional forwarders are configure in Windows Server 2008 R2. First, you need to click new and then enter the domain name for the respective forest followed by clicking “OK”.

Figure 10: Adding DNS domain
Now select the new domain name and then enter the IP address of the Domain Controller in that domain in the text box under “Selected domain’s forwarder IP address list” and click “Add”.

Figure 11: Adding domain names and forwarding servers
Do the same for the other forest domain and then click “OK” and close the DNS console.
Now verify that you can ping the servers in the two other forests.
That’s it we have now configured DNS name resolution between the 3 Exchange forests.

Figure 12: Verifying servers in other forests can be pinged using the server FQDN
That’s enough for part 1 of this multi-part article. But no worries, we have only just begun and still have a lot more to cover. You can look forward to part 2 in a very near future.
If you would like to read the other parts in this article series please go to:
- Deep dive into rich coexistence between Exchange Forests (Part 2)
- Deep dive into rich coexistence between Exchange Forests (Part 3)
- Deep dive into rich coexistence between Exchange Forests (Part 4)
- Deep dive into rich coexistence between Exchange Forests (Part 5)
- Deep dive into rich coexistence between Exchange Forests (Part 6)
- Deep dive into rich coexistence between Exchange Forests (Part 7)
- Deep dive into rich coexistence between Exchange Forests (Part 8)
- Deep dive into rich coexistence between Exchange Forests (Part 9)
- Deep dive into rich coexistence between Exchange Forests (Part 10)
- Deep dive into rich coexistence between Exchange Forests (Part 11)
- Deep dive into rich coexistence between Exchange Forests (Part 12)
- Deep dive into rich coexistence between Exchange Forests (Part 13)
- Deep dive into rich coexistence between Exchange Forests (Part 14)
- Deep dive into rich coexistence between Exchange Forests (Part 15)


